Deploy LayoutLM with Hugging Face Inference Endpoints
In this blog, you will learn how to deploy a fine-tune LayoutLM (v1) for document-understand using Hugging Face Inference Endpoints. LayoutLM is a multimodal Transformer model for document image understanding and information extraction transformers and can be used form understanding and receipt understanding. LayoutLM (v1) is the only model in the LayoutLM family with an MIT-license, which allows it to be used for commercial purposes compared to other LayoutLMv2/LayoutLMv3.
If you want to learn how to fine-tune LayoutLM, you should check out my previous blog post, “Document AI: Fine-tuning LayoutLM for document-understanding using Hugging Face Transformers”
Before we can get started, make sure you meet all of the following requirements:
- An Organization/User with an active plan and WRITE access to the model repository.
- Can access the UI: https://ui.endpoints.huggingface.co
The Tutorial will cover how to:
- Deploy the custom handler as an Inference Endpoint
- Send HTTP request using Python
- Draw result on image
What is Hugging Face Inference Endpoints?
🤗 Inference Endpoints offers a secure production solution to easily deploy Machine Learning models on dedicated and autoscaling infrastructure managed by Hugging Face.
A Hugging Face Inference Endpoint is built from a Hugging Face Model Repository. It supports all the Transformers and Sentence-Transformers tasks and any arbitrary ML Framework through easy customization by adding a custom inference handler. This custom inference handler can be used to implement simple inference pipelines for ML Frameworks like Keras, Tensorflow, and scit-kit learn or can be used to add custom business logic to your existing transformers pipeline.
Tutorial: Deploy LayoutLM and Send requests
In this tutorial, you will learn how to deploy a LayoutLM to Hugging Face Inference Endpoints and how you can integrate it via an API into your products.
This tutorial is not covering how you create the custom handler for inference. If you want to learn how to create a custom Handler for Inference Endpoints, you can either checkout the documentation or go through “Custom Inference with Hugging Face Inference Endpoints”
We are going to deploy philschmid/layoutlm-funsd which implements the following handler.py
from typing import Dict, List, Any
from transformers import LayoutLMForTokenClassification, LayoutLMv2Processor
import torch
from subprocess import run

# install tesseract-ocr and pytesseract
run("apt install -y tesseract-ocr", shell=True, check=True)
run("pip install pytesseract", shell=True, check=True)

# helper function to unnormalize bboxes for drawing onto the image
def unnormalize_box(bbox, width, height):
    return [
        width * (bbox[0] / 1000),
        height * (bbox[1] / 1000),
        width * (bbox[2] / 1000),
        height * (bbox[3] / 1000),
    ]

# set device
device = torch.device("cuda" if torch.cuda.is_available() else "cpu")

class EndpointHandler:
    def __init__(self, path=""):
        # load model and processor from path
        self.model = LayoutLMForTokenClassification.from_pretrained(path).to(device)
        self.processor = LayoutLMv2Processor.from_pretrained(path)

    def __call__(self, data: Dict[str, bytes]) -> Dict[str, List[Any]]:
        """
        Args:
            data (:obj:):
                includes the deserialized image file as PIL.Image
        """
        # process input
        image = data.pop("inputs", data)

        # process image
        encoding = self.processor(image, return_tensors="pt")

        # run prediction
        with torch.inference_mode():
            outputs = self.model(
                input_ids=encoding.input_ids.to(device),
                bbox=encoding.bbox.to(device),
                attention_mask=encoding.attention_mask.to(device),
                token_type_ids=encoding.token_type_ids.to(device),
            )
            predictions = outputs.logits.softmax(-1)

        # post process output
        result = []
        for item, inp_ids, bbox in zip(
            predictions.squeeze(0).cpu(), encoding.input_ids.squeeze(0).cpu(), encoding.bbox.squeeze(0).cpu()
        ):
            label = self.model.config.id2label[int(item.argmax().cpu())]
            if label == "O":
                continue
            score = item.max().item()
            text = self.processor.tokenizer.decode(inp_ids)
            bbox = unnormalize_box(bbox.tolist(), image.width, image.height)
            result.append({"label": label, "score": score, "text": text, "bbox": bbox})
        return {"predictions": result}
1. Deploy the custom handler as an Inference Endpoint
UI: https://ui.endpoints.huggingface.co/
the first step is to deploy our model as an Inference Endpoint. We can deploy our custom Custom Handler the same way as a regular Inference Endpoint.
Select the repository, the cloud, and the region, adjust the instance and security settings, and deploy.

The Inference Endpoint Service will check during the creation of your Endpoint if there is a handler.py available and valid and will use it for serving requests no matter which “Task” you select.
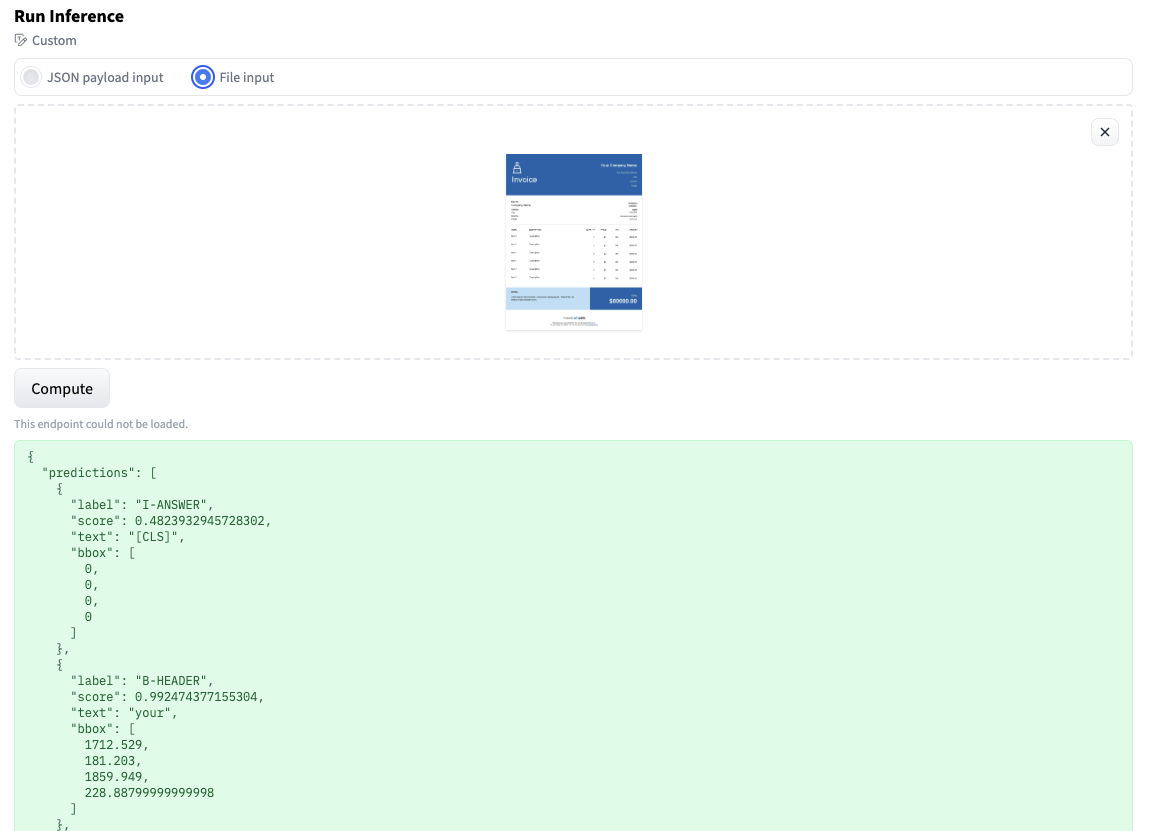
Note: Make sure to check that the “Task” in the Advanced Config is “Custom”. This will replace the inference widget with the custom Inference widget too easily test our model.

After deploying our endpoint, we can test it using the inference widget. Since we have a Custom task, we can directly upload a form as “file input”.
2. Send HTTP request using Python
Hugging Face Inference endpoints can directly work with binary data, this means that we can directly send our image from our document to the endpoint. We are going to use requests to send our requests. (make your you have it installed pip install requests)
import json
import requests as r
import mimetypes

ENDPOINT_URL="" # url of your endpoint
HF_TOKEN="" # organization token where you deployed your endpoint

def predict(path_to_image:str=None):
    with open(path_to_image, "rb") as i:
      b = i.read()
    headers= {
        "Authorization": f"Bearer {HF_TOKEN}",
        "Content-Type": mimetypes.guess_type(path_to_image)[0]
    }
    response = r.post(ENDPOINT_URL, headers=headers, data=b)
    return response.json()

prediction = predict(path_to_image="path_to_your_image.png")

print(prediction)
# {'predictions': [{'label': 'I-ANSWER', 'score': 0.4823932945728302, 'text': '[CLS]', 'bbox': [0.0, 0.0, 0.0, 0.0]}, {'label': 'B-HEADER', 'score': 0.992474377155304, 'text': 'your', 'bbox': [1712.529, 181.203, 1859.949, 228.88799999999998]},
3. Draw result on image
To get a better understanding of what the model predicted you can also draw the predictions on the provided image.
from PIL import Image, ImageDraw, ImageFont

# draw results on image
def draw_result(path_to_image,result):
  image = Image.open(path_to_image)
  label2color = {
      "B-HEADER": "blue",
      "B-QUESTION": "red",
      "B-ANSWER": "green",
      "I-HEADER": "blue",
      "I-QUESTION": "red",
      "I-ANSWER": "green",
  }

  # draw predictions over the image
  draw = ImageDraw.Draw(image)
  font = ImageFont.load_default()
  for res in result:
      draw.rectangle(res["bbox"], outline="black")
      draw.rectangle(res["bbox"], outline=label2color[res["label"]])
      draw.text((res["bbox"][0] + 10, res["bbox"][1] - 10), text=res["label"], fill=label2color[res["label"]], font=font)
  return image

draw_result("path_to_your_image.png", prediction["predictions"])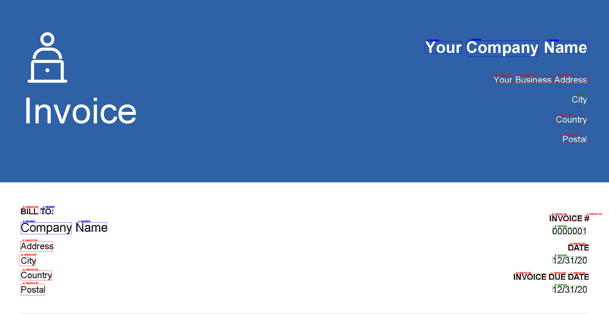
Conclusion
That's it we successfully deploy our LayoutLM to Hugging Face Inference Endpoints and run some predictions.
To underline this again, we created a managed, secure, scalable inference endpoint that runs our custom handler, including our custom logic. This will allow Data scientists and Machine Learning Engineers to focus on R&D, improving the model rather than fiddling with MLOps topics.
Now, it's your turn! Sign up and create your custom handler within a few minutes!
Thanks for reading! If you have any questions, feel free to contact me, through Github, or on the forum. You can also connect with me on Twitter or LinkedIn.