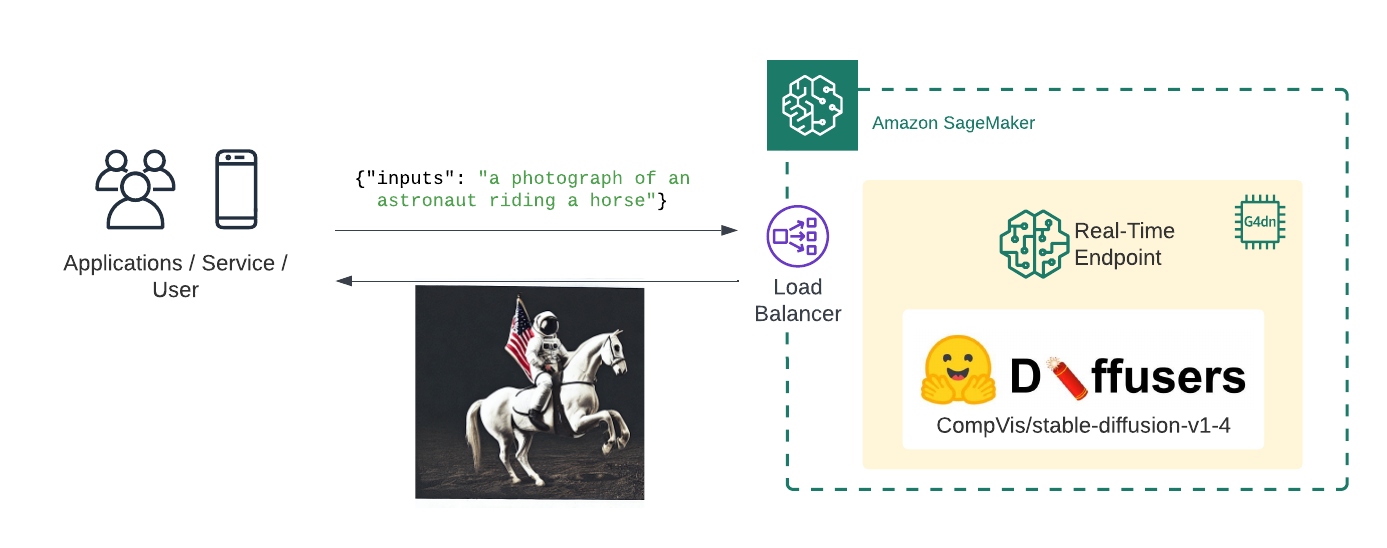
Stable Diffusion on Amazon SageMaker
Welcome to this Amazon SageMaker guide on how to use the Stable Diffusion to generate image for a given input prompt. We will deploy CompVis/stable-diffusion-v1-4 to Amazon SageMake for real-time inference using Hugging Faces 🧨 Diffusers library.
What we are going to do:
- Create Stable Diffusion inference script
- Create SageMaker
model.tar.gzartifact - Deploy the model to Amazon SageMaker
- Generate images using the deployed model
What is Stable Diffusion?
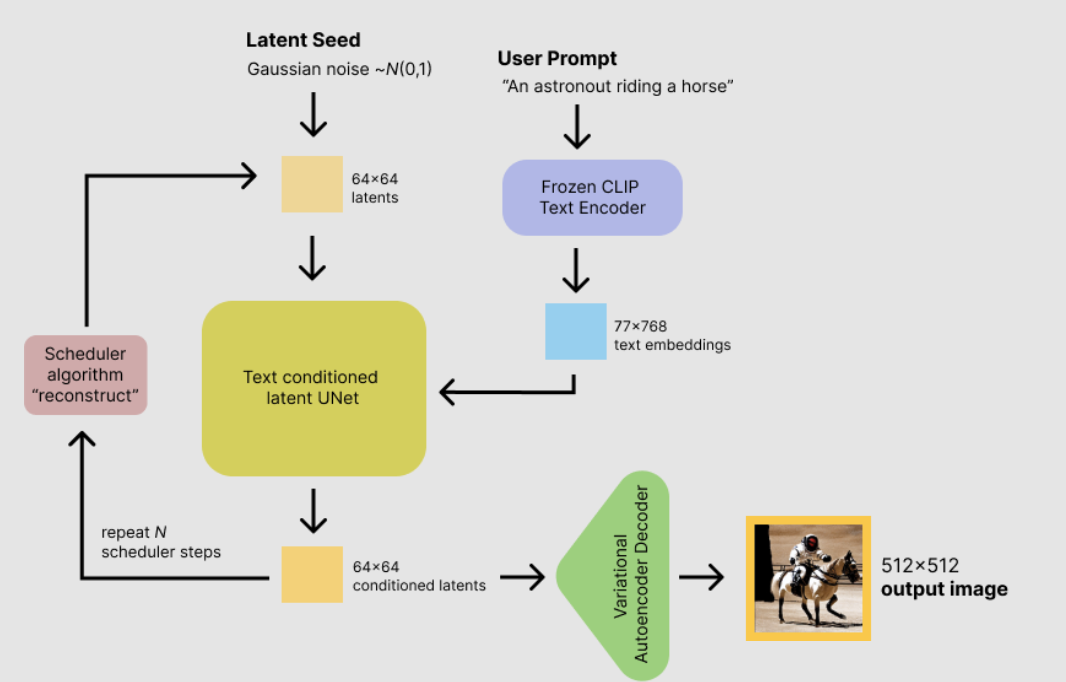
Stable Diffusion is a text-to-image latent diffusion model created by the researchers and engineers from CompVis, Stability AI and LAION. It is trained on 512x512 images from a subset of the LAION-5B database. LAION-5B is the largest, freely accessible multi-modal dataset that currently exists.
This guide will not explain how the model works. If you are interested you should checkout the Stable Diffusion with 🧨 Diffusers blog post or The Annotated Diffusion Model
Before we can get started, make sure you have Hugging Face user account. The account is needed to load the CompVis/stable-diffusion-v1-4 from the Hugging Face Hub.
Create account: https://huggingface.co/join
Before we can get started we have to install the missing dependencies to be able to create our model.tar.gz artifact and create our Amazon SageMaker endpoint.
We also have to make sure we have the permission to create our SageMaker Endpoint.
!pip install "sagemaker==2.116.0" "huggingface_hub==0.10.1" --upgrade --quietIf you are going to use Sagemaker in a local environment (not SageMaker Studio or Notebook Instances). You need access to an IAM Role with the required permissions for Sagemaker. You can find here more about it.
import sagemaker
import boto3
sess = sagemaker.Session()
# sagemaker session bucket -> used for uploading data, models and logs
# sagemaker will automatically create this bucket if it not exists
sagemaker_session_bucket=None
if sagemaker_session_bucket is None and sess is not None:
    # set to default bucket if a bucket name is not given
    sagemaker_session_bucket = sess.default_bucket()

try:
    role = sagemaker.get_execution_role()
except ValueError:
    iam = boto3.client('iam')
    role = iam.get_role(RoleName='sagemaker_execution_role')['Role']['Arn']

sess = sagemaker.Session(default_bucket=sagemaker_session_bucket)

print(f"sagemaker role arn: {role}")
print(f"sagemaker bucket: {sess.default_bucket()}")
print(f"sagemaker session region: {sess.boto_region_name}")
1. Create Stable Diffusion inference script
Amazon SageMaker allows us to customize the inference script by providing a inference.py file. The inference.py file is the entry point to our model. It is responsible for loading the model and handling the inference request. If you are used to deploying Hugging Face Transformers that might be knew to you. Usually, we just provide the HF_MODEL_ID and HF_TASK and the Hugging Face DLC takes care of the rest. For diffusers thats not yet possible. We have to provide the inference.py file and implement the model_fn and predict_fn functions.
If you want to learn more about creating a custom inference script you can check out Creating document embeddings with Hugging Face's Transformers & Amazon SageMaker
In addition to the inference.py file we also have to provide a requirements.txt file. The requirements.txt file is used to install the dependencies for our inference.py file.
The first step is to create a code/ directory.
!mkdir codeAs next we create a requirements.txt file and add the diffusers library to it.
%%writefile code/requirements.txt
diffusers==0.6.0
transformers==4.23.1
The last step for our inference handler is to create the inference.py file. The inference.py file is responsible for loading the model and handling the inference request. The model_fn function is called when the model is loaded. The predict_fn function is called when we want to do inference.
We are using the diffusers library to load the model in the model_fn and generate 4 image for an input prompt with the predict_fn. The predict_fn function returns the 4 image as a base64 encoded string.
%%writefile code/inference.py
import base64
import torch
from io import BytesIO
from diffusers import StableDiffusionPipeline


def model_fn(model_dir):
    # Load stable diffusion and move it to the GPU
    pipe = StableDiffusionPipeline.from_pretrained(model_dir, torch_dtype=torch.float16)
    pipe = pipe.to("cuda")

    return pipe


def predict_fn(data, pipe):

    # get prompt & parameters
    prompt = data.pop("inputs", data)
    # set valid HP for stable diffusion
    num_inference_steps = data.pop("num_inference_steps", 50)
    guidance_scale = data.pop("guidance_scale", 7.5)
    num_images_per_prompt = data.pop("num_images_per_prompt", 4)

    # run generation with parameters
    generated_images = pipe(
        prompt,
        num_inference_steps=num_inference_steps,
        guidance_scale=guidance_scale,
        num_images_per_prompt=num_images_per_prompt,
    )["images"]

    # create response
    encoded_images = []
    for image in generated_images:
        buffered = BytesIO()
        image.save(buffered, format="JPEG")
        encoded_images.append(base64.b64encode(buffered.getvalue()).decode())

    # create response
    return {"generated_images": encoded_images}
2. Create SageMaker model.tar.gz artifact
To use our inference.py we need to bundle it together with our model weights into a model.tar.gz. The archive includes all our model-artifcats to run inference. The inference.py script will be placed into a code/ folder. We will use the huggingface_hub SDK to easily download CompVis/stable-diffusion-v1-4 from Hugging Face and then upload it to Amazon S3 with the sagemaker SDK.
Before we can load our model from the Hugging Face Hub we have to make sure that we accepted the license of CompVis/stable-diffusion-v1-4 to be able to use it. CompVis/stable-diffusion-v1-4 is published under the CreativeML OpenRAIL-M license. You can accept the license by clicking on the Agree and access repository button on the model page at: https://huggingface.co/CompVis/stable-diffusion-v1-4.
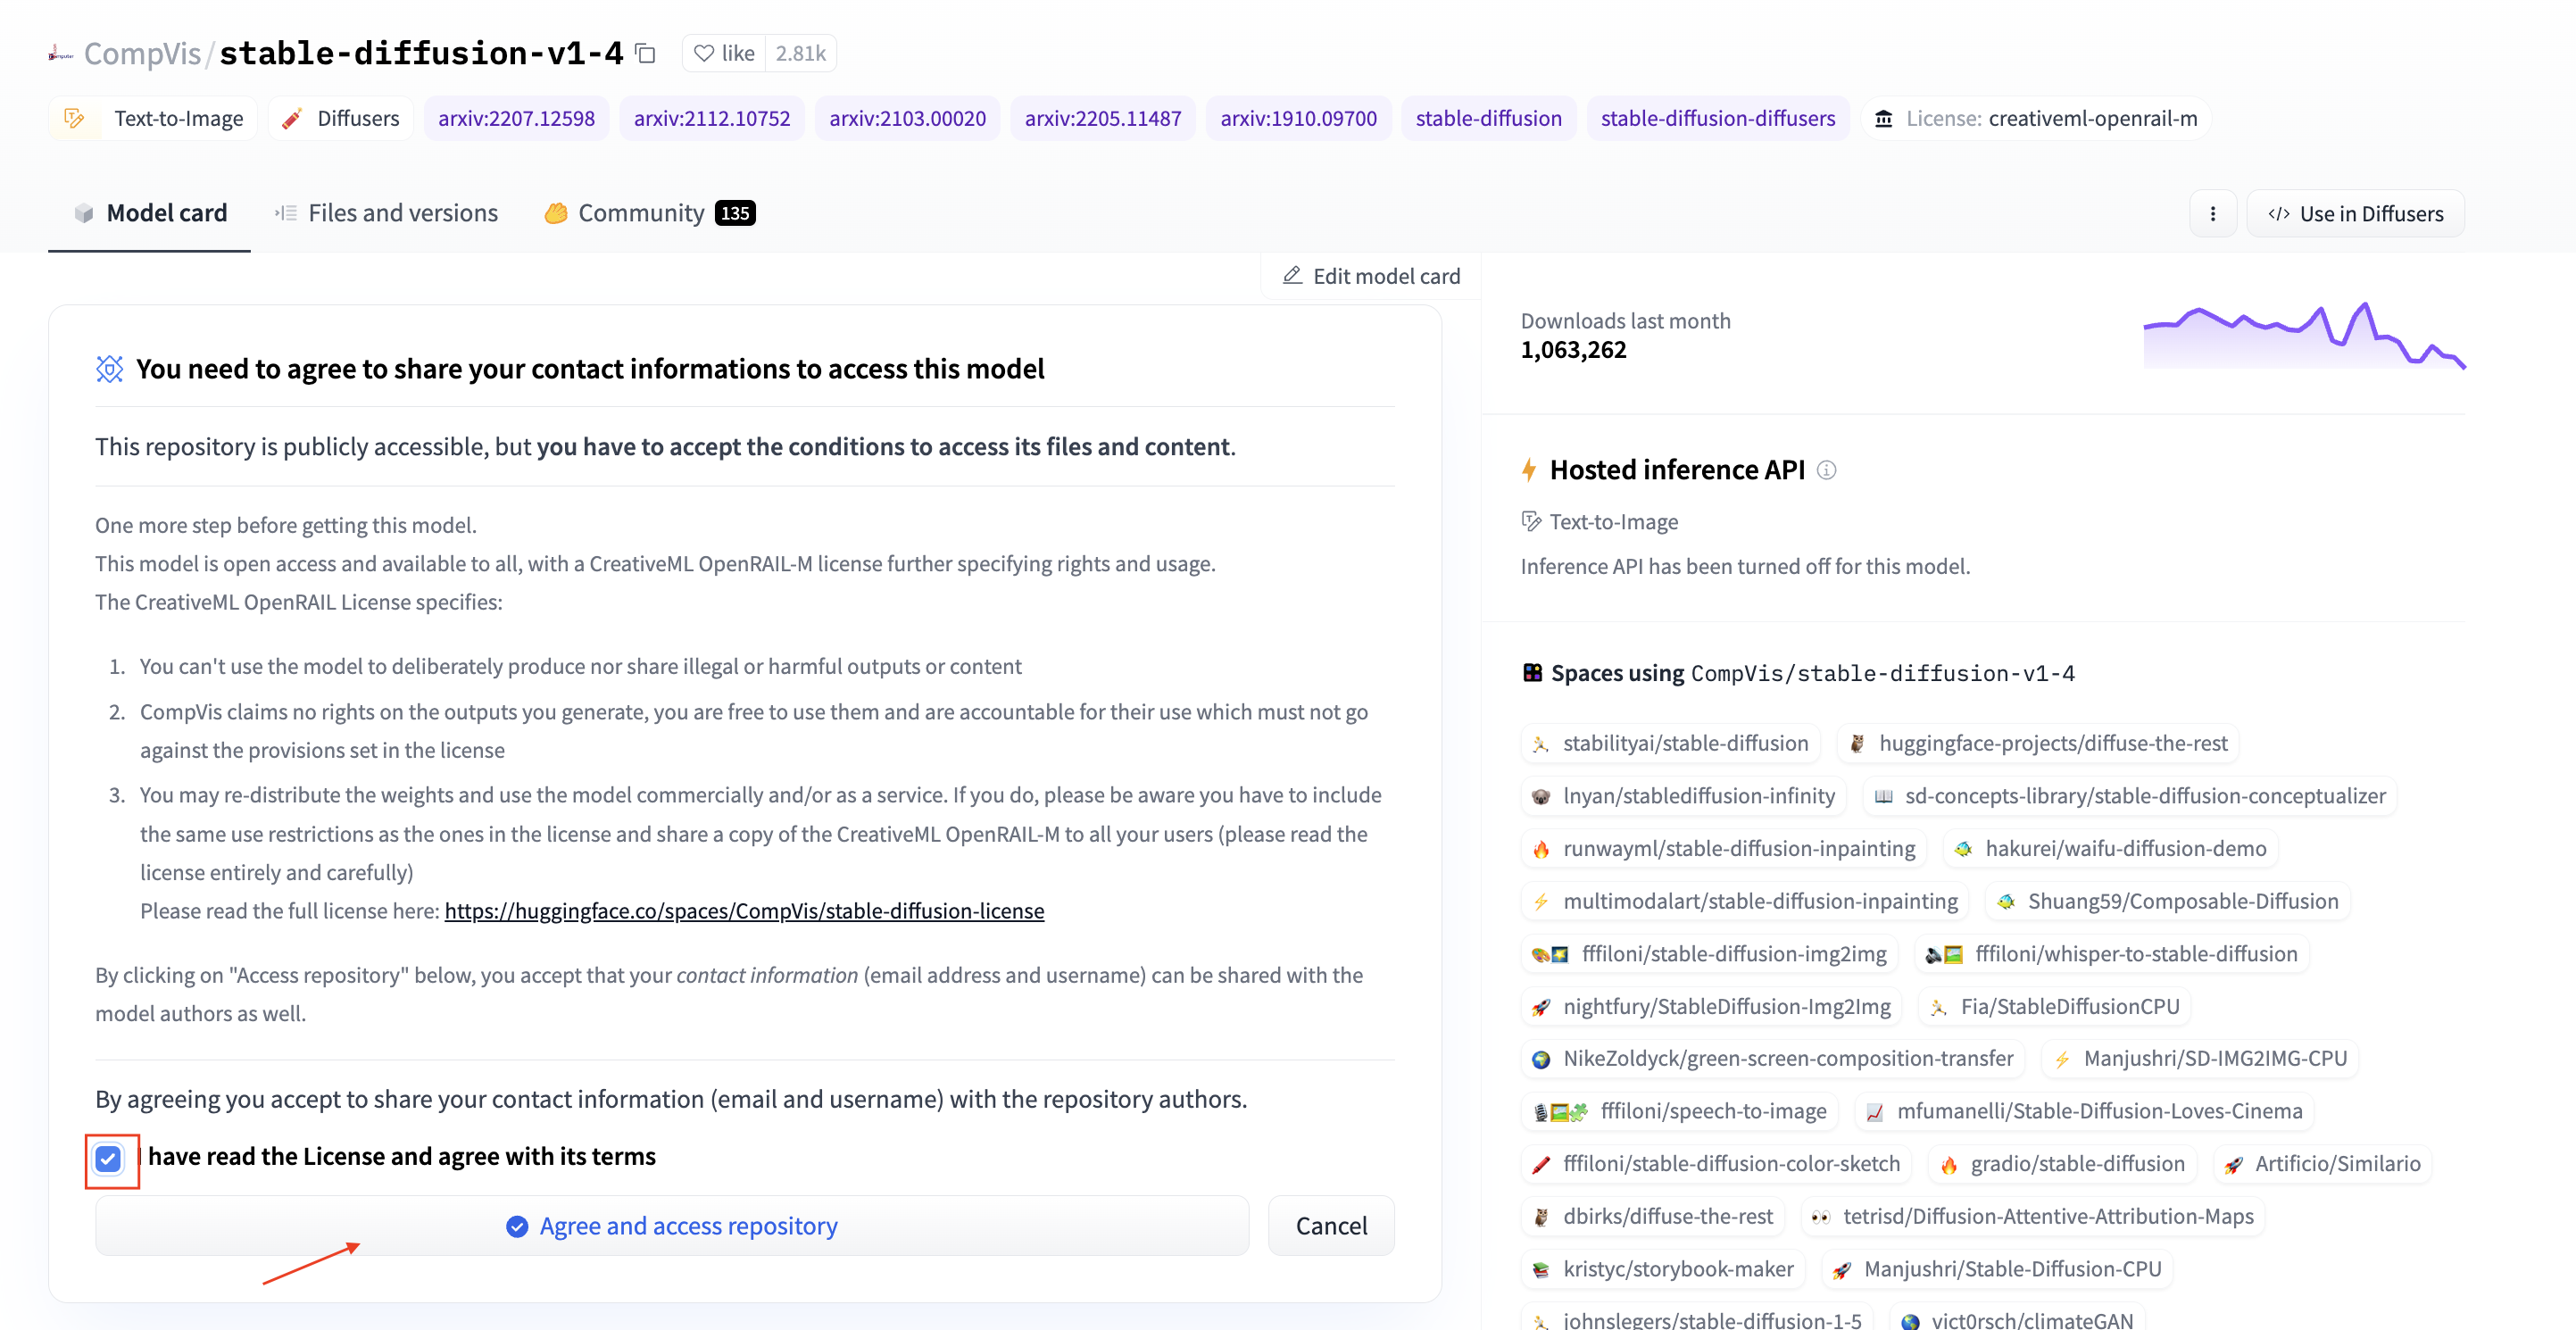
Note: This will give access to the repository for the logged in user. This user can then be used to generate HF Tokens to load the model programmatically.
Before we can load the model make sure you have a valid HF Token. You can create a token by going to your Hugging Face Settings and clicking on the New token button. Make sure the enviornment has enough diskspace to store the model, ~30GB should be enough.
from distutils.dir_util import copy_tree
from pathlib import Path
from huggingface_hub import snapshot_download
import random

HF_MODEL_ID="CompVis/stable-diffusion-v1-4"
HF_TOKEN="" # your hf token: https://huggingface.co/settings/tokens
assert len(HF_TOKEN) > 0, "Please set HF_TOKEN to your huggingface token. You can find it here: https://huggingface.co/settings/tokens"

# download snapshot
snapshot_dir = snapshot_download(repo_id=HF_MODEL_ID,revision="fp16",use_auth_token=HF_TOKEN)

# create model dir
model_tar = Path(f"model-{random.getrandbits(16)}")
model_tar.mkdir(exist_ok=True)

# copy snapshot to model dir
copy_tree(snapshot_dir, str(model_tar))
The next step is to copy the code/ directory into the model/ directory.
# copy code/ to model dir
copy_tree("code/", str(model_tar.joinpath("code")))
Before we can upload the model to Amazon S3 we have to create a model.tar.gz archive. Important is that the archive should directly contain all files and not a folder with the files. For example, your file should look like this:
model.tar.gz/
|- model_index.json
|- unet/
|- code/import tarfile
import os
# helper to create the model.tar.gz
def compress(tar_dir=None,output_file="model.tar.gz"):
parent_dir=os.getcwd()
os.chdir(tar_dir)
with tarfile.open(os.path.join(parent_dir, output_file), "w:gz") as tar:
for item in os.listdir('.'):
print(item)
tar.add(item, arcname=item)
os.chdir(parent_dir)
compress(str(model_tar))After we created the model.tar.gz archive we can upload it to Amazon S3. We will use the sagemaker SDK to upload the model to our sagemaker session bucket.
from sagemaker.s3 import S3Uploader

# upload model.tar.gz to s3
s3_model_uri=S3Uploader.upload(local_path="model.tar.gz", desired_s3_uri=f"s3://{sess.default_bucket()}/stable-diffusion-v1-4")

print(f"model uploaded to: {s3_model_uri}")
3. Deploy the model to Amazon SageMaker
After we have uploaded our model archive we can deploy our model to Amazon SageMaker. We will use HuggingfaceModel to create our real-time inference endpoint.
We are going to deploy the model to an g4dn.xlarge instance. The g4dn.xlarge instance is a GPU instance with 1 NVIDIA Tesla T4 GPUs. If you are interested in how you could add autoscaling to your endpoint you can check out Going Production: Auto-scaling Hugging Face Transformers with Amazon SageMaker.
from sagemaker.huggingface.model import HuggingFaceModel


# create Hugging Face Model Class
huggingface_model = HuggingFaceModel(
   model_data=s3_model_uri,      # path to your model and script
   role=role,                    # iam role with permissions to create an Endpoint
   transformers_version="4.17",  # transformers version used
   pytorch_version="1.10",       # pytorch version used
   py_version='py38',            # python version used
)

# deploy the endpoint endpoint
predictor = huggingface_model.deploy(
    initial_instance_count=1,
    instance_type="ml.g4dn.xlarge"
    )
4. Generate images using the deployed model
The .deploy() returns an HuggingFacePredictor object which can be used to request inference. Our endpoint expects a json with at least inputs key. The inputs key is the input prompt for the model, which will be used to generate the image. Additionally, we can provide num_inference_steps, guidance_scale & num_images_per_prompt to controll the generation.
The predictor.predict() function returns a json with the generated_images key. The generated_images key contains the 4 generated images as a base64 encoded string. To decode our response we added a small helper function decode_base64_to_image which takes the base64 encoded string and returns a PIL.Image object and display_images, which takes a list of PIL.Image objects and displays them.
from PIL import Image
from io import BytesIO
from IPython.display import display
import base64
import matplotlib.pyplot as plt

# helper decoder
def decode_base64_image(image_string):
  base64_image = base64.b64decode(image_string)
  buffer = BytesIO(base64_image)
  return Image.open(buffer)

# display PIL images as grid
def display_images(images=None,columns=3, width=100, height=100):
    plt.figure(figsize=(width, height))
    for i, image in enumerate(images):
        plt.subplot(int(len(images) / columns + 1), columns, i + 1)
        plt.axis('off')
        plt.imshow(image)
Now, lets generate some images. As example lets generate 3 images for the prompt A dog trying catch a flying pizza art drawn by disney concept artists. Generating 3 images takes around 30 seconds.
num_images_per_prompt = 3
prompt = "A dog trying catch a flying pizza art drawn by disney concept artists, golden colour, high quality, highly detailed, elegant, sharp focus"

# run prediction
response = predictor.predict(data={
  "inputs": prompt,
  "num_images_per_prompt" : num_images_per_prompt
  }
)

# decode images
decoded_images = [decode_base64_image(image) for image in response["generated_images"]]

# visualize generation
display_images(decoded_images)
Delete model and endpoint
To clean up, we can delete the model and endpoint.
predictor.delete_model()
predictor.delete_endpoint()
Thanks for reading! If you have any questions, feel free to contact me on Twitter or LinkedIn.