Multi-Container Endpoints with Hugging Face Transformers and Amazon SageMaker
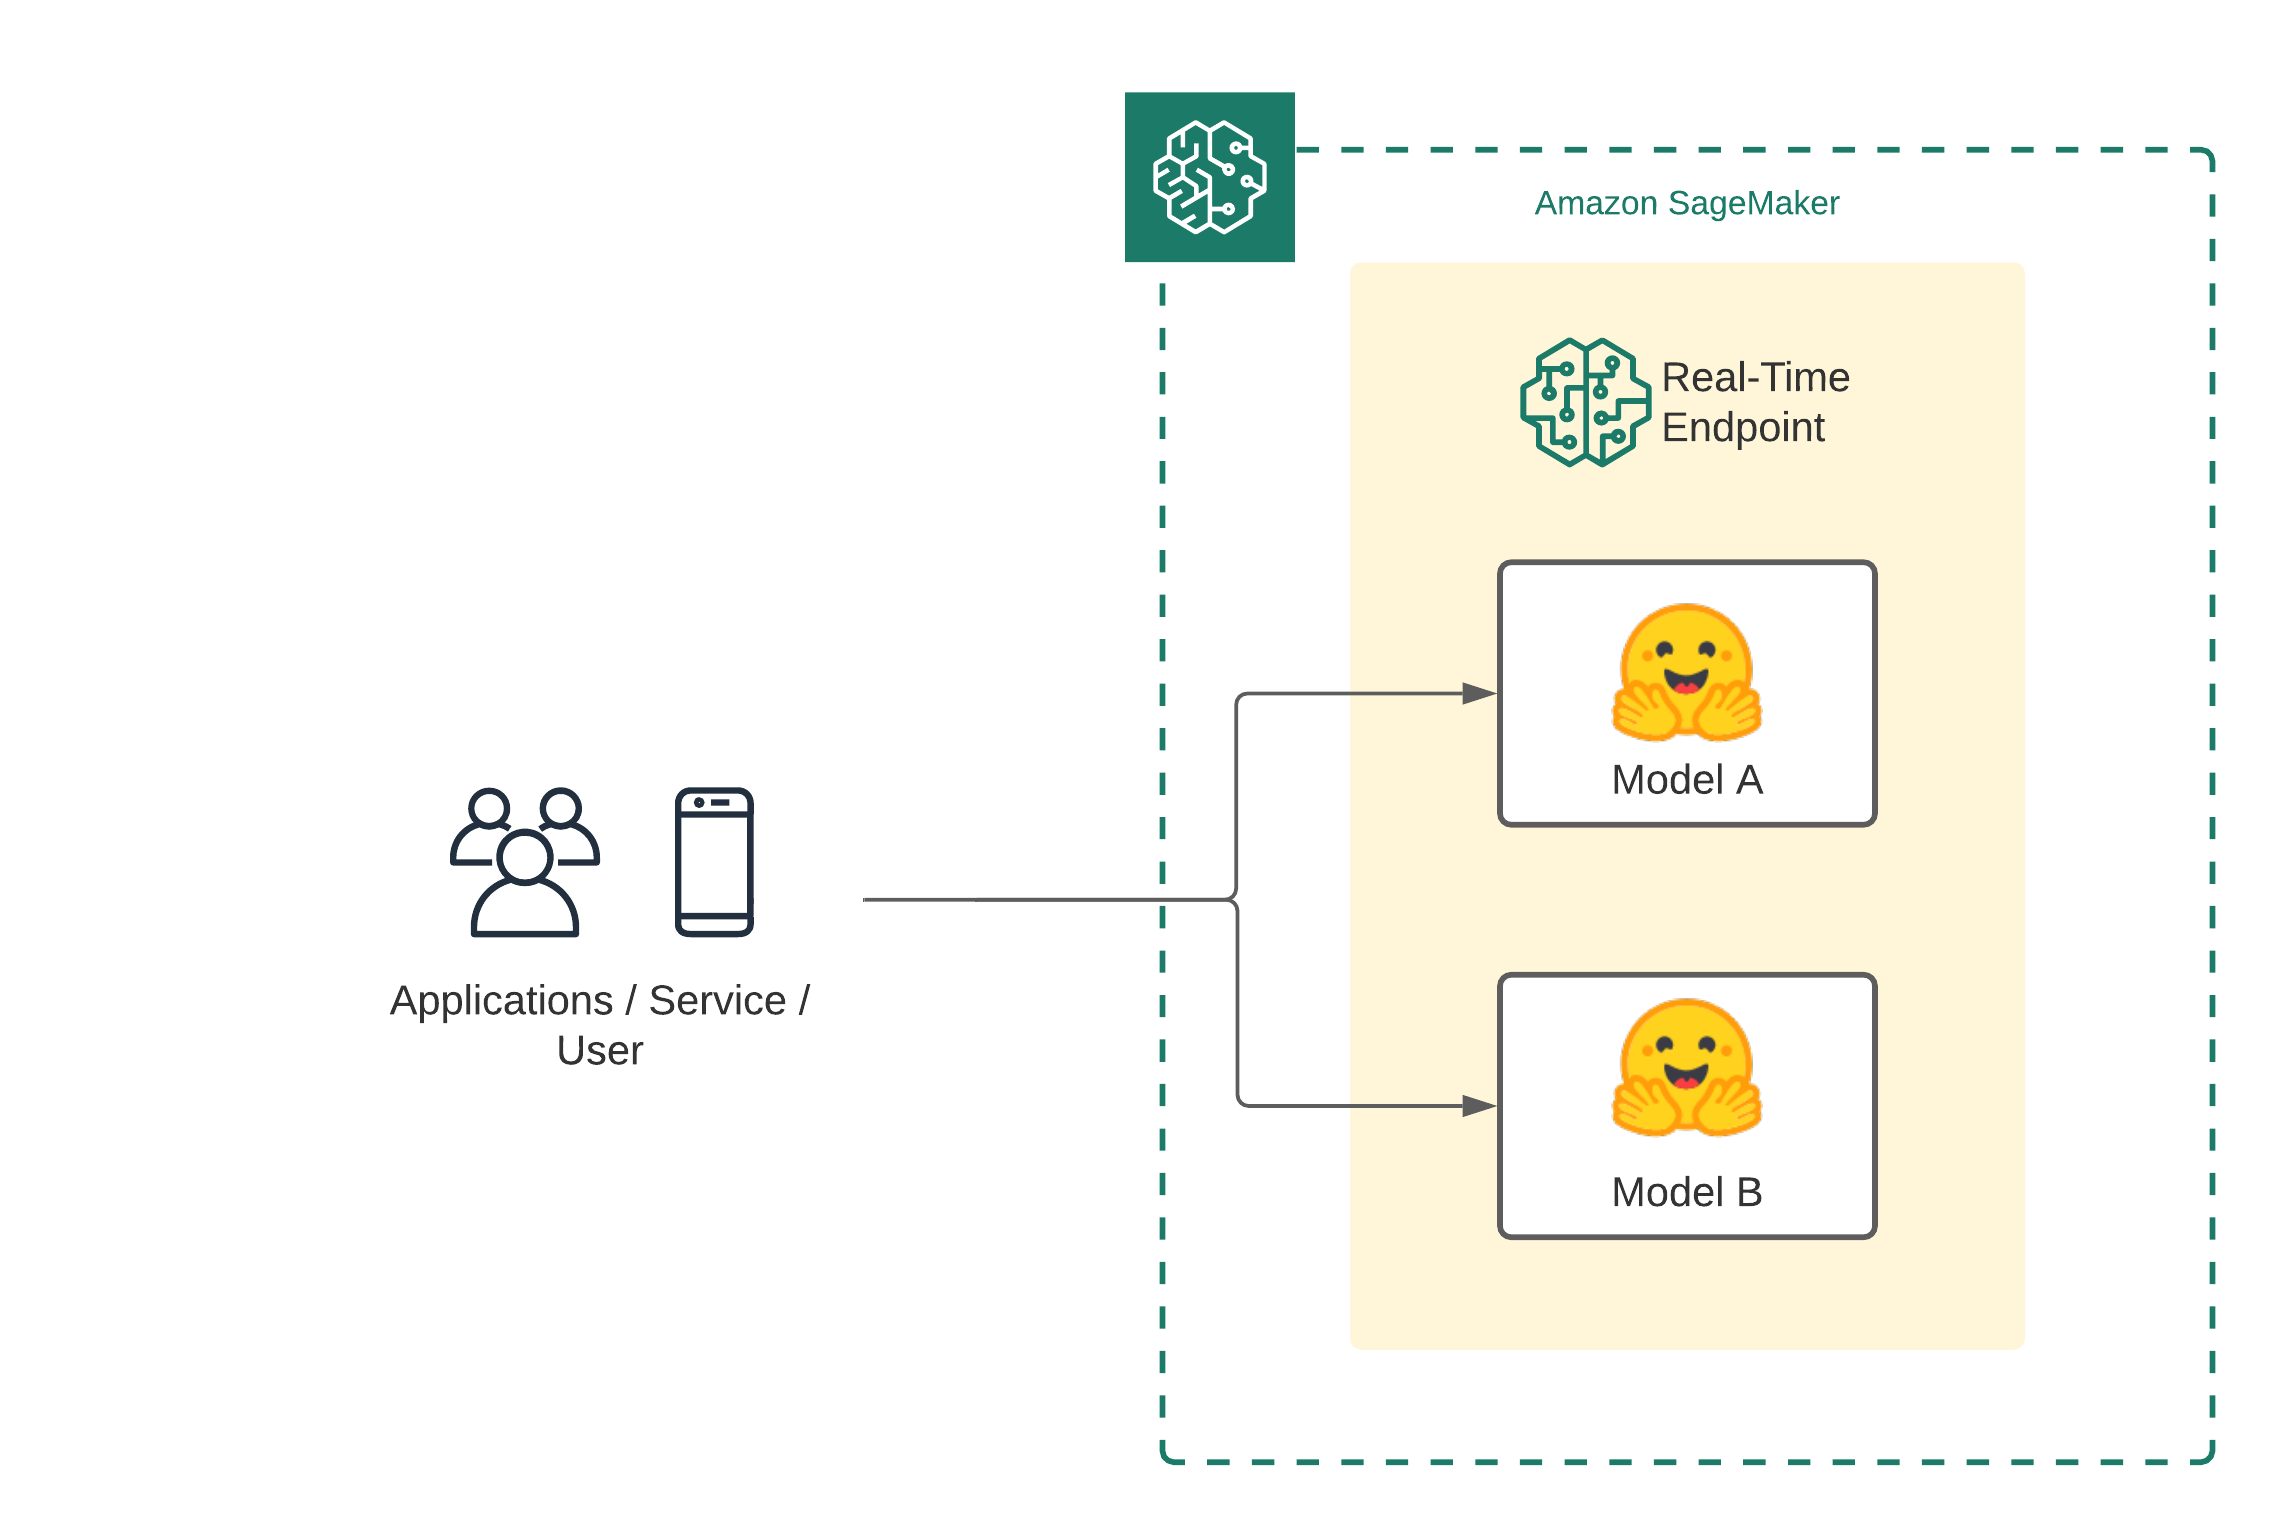
Welcome to this getting started guide. We will use the Hugging Face Inference DLCs and Amazon SageMaker to deploy multiple transformer models as Multi-Container Endpoint. Amazon SageMaker Multi-Container Endpoint is an inference option to deploy multiple containers (multiple models) to the same SageMaker real-time endpoint. These models/containers can be accessed individually or in a pipeline. Amazon SageMaker Multi-Container Endpoint can be used to improve endpoint utilization and optimize costs. An example for this is time zone differences, the workload for model A (U.S) is mostly at during the day and the workload for model B (Germany) is mostly during the night, you can deploy model A and model B to the same SageMaker endpoint and optimize your costs.
NOTE: At the time of writing this, only CPU Instances are supported for Multi-Container Endpoint.
Development Environment and Permissions
NOTE: You can run this demo in Sagemaker Studio, your local machine, or Sagemaker Notebook Instances
%pip install sagemaker --upgrade
import sagemaker

assert sagemaker.__version__ >= "2.75.0"
Permissions
If you are going to use Sagemaker in a local environment (not SageMaker Studio or Notebook Instances). You need access to an IAM Role with the required permissions for Sagemaker. You can find here more about it.
import sagemaker
import boto3
sess = sagemaker.Session()
# sagemaker session bucket -> used for uploading data, models and logs
# sagemaker will automatically create this bucket if it not exists
sagemaker_session_bucket=None
if sagemaker_session_bucket is None and sess is not None:
    # set to default bucket if a bucket name is not given
    sagemaker_session_bucket = sess.default_bucket()

try:
    role = sagemaker.get_execution_role()
except ValueError:
    iam = boto3.client('iam')
    role = iam.get_role(RoleName='sagemaker_execution_role')['Role']['Arn']

sess = sagemaker.Session(default_bucket=sagemaker_session_bucket)
region = sess.boto_region_name
sm_client = boto3.client('sagemaker')

print(f"sagemaker role arn: {role}")
print(f"sagemaker bucket: {sess.default_bucket()}")
print(f"sagemaker session region: {region}")
Multi-Container Endpoint creation
When writing this does the Amazon SageMaker Python SDK not support Multi-Container Endpoint deployments. That's why we are going to use boto3 to create the endpoint.
The first step though is to use the SDK to get our container uris for the Hugging Face Inference DLCs.
from sagemaker import image_uris

hf_inference_dlc = image_uris.retrieve(framework='huggingface',
                                region=region,
                                version='4.12.3',
                                image_scope='inference',
                                base_framework_version='pytorch1.9.1',
                                py_version='py38',
                                container_version='ubuntu20.04',
                                instance_type='ml.c5.xlarge')
# '763104351884.dkr.ecr.us-east-1.amazonaws.com/huggingface-pytorch-inference:1.9.1-transformers4.12.3-gpu-py38-cu111-ubuntu20.04'
Define Hugging Face models
Next, we need to define the models we want to deploy to our multi-container endpoint. To stick with our example from the introduction, we will deploy an English sentiment-classification model and a german sentiment-classification model. For the English model, we will use distilbert-base-uncased-finetuned-sst-2-english and for the German model, we will use oliverguhr/german-sentiment-bert.
Similar to the endpoint creation with the SageMaker SDK do we need to provide the "Hub" configurations for the models as HF_MODEL_ID and HF_TASK.
# english model
englishModel = {
    'Image': hf_inference_dlc,
    'ContainerHostname': 'englishModel',
    'Environment': {
	    'HF_MODEL_ID':'distilbert-base-uncased-finetuned-sst-2-english',
	    'HF_TASK':'text-classification'
    }
}

# german model
germanModel = {
    'Image': hf_inference_dlc,
    'ContainerHostname': 'germanModel',
    'Environment': {
	    'HF_MODEL_ID':'oliverguhr/german-sentiment-bert',
	    'HF_TASK':'text-classification'
    }
}

# Set the Mode parameter of the InferenceExecutionConfig field to Direct for direct invocation of each container,
# or Serial to use containers as an inference pipeline. The default mode is Serial.
inferenceExecutionConfig = {"Mode": "Direct"}
Create Multi-Container Endpoint
After we define our model configuration, we can deploy our endpoint. To create/deploy a real-time endpoint with boto3 you need to create a "SageMaker Model", a "SageMaker Endpoint Configuration" and a "SageMaker Endpoint". The "SageMaker Model" contains our multi-container configuration including our two models. The "SageMaker Endpoint Configuration" contains the configuration for the endpoint. The "SageMaker Endpoint" is the actual endpoint.
deployment_name = "multi-container-sentiment"
instance_type =  "ml.c5.4xlarge"


# create SageMaker Model
sm_client.create_model(
    ModelName        = f"{deployment_name}-model",
    InferenceExecutionConfig = inferenceExecutionConfig,
    ExecutionRoleArn = role,
    Containers       = [englishModel, germanModel]
    )

# create SageMaker Endpoint configuration
sm_client.create_endpoint_config(
    EndpointConfigName= f"{deployment_name}-config",
    ProductionVariants=[
        {
            "VariantName": "AllTraffic",
            "ModelName":  f"{deployment_name}-model",
            "InitialInstanceCount": 1,
            "InstanceType": instance_type,
        },
    ],
)

# create SageMaker Endpoint configuration
endpoint = sm_client.create_endpoint(
    EndpointName= f"{deployment_name}-ep", EndpointConfigName=f"{deployment_name}-config"
)
this will take a few minutes to deploy. You can check the console to see if the endpoint is in service
Invoke Multi-Container Endpoint
To invoke our multi-container endpoint we can either use boto3 or any other AWS SDK or the Amazon SageMaker SDK. We will test both ways and do some light load testing to take a look at the performance of our endpoint in cloudwatch.
english_payload={"inputs":"This is a great way for saving money and optimizing my resources."}

german_payload={"inputs":"Das wird uns sehr helfen unsere Ressourcen effizient zu nutzen."}
Sending requests with boto3
To send requests to our models we will use the sagemaker-runtime with the invoke_endpoint method. Compared to sending regular requests to a single-container endpoint we are passing TargetContainerHostname as additional information to point to the container, which should receive the request. In our case this is either englishModel or germanModel.
englishModel
import json
import boto3

# create client
invoke_client = boto3.client('sagemaker-runtime')

# send request to first container (bi-encoder)
response = invoke_client.invoke_endpoint(
    EndpointName=f"{deployment_name}-ep",
    ContentType="application/json",
    Accept="application/json",
    TargetContainerHostname="englishModel",
    Body=json.dumps(english_payload),
)
result = json.loads(response['Body'].read().decode())
germanModel
import json
import boto3

# create client
invoke_client = boto3.client('sagemaker-runtime')

# send request to first container (bi-encoder)
response = invoke_client.invoke_endpoint(
    EndpointName=f"{deployment_name}-ep",
    ContentType="application/json",
    Accept="application/json",
    TargetContainerHostname="germanModel",
    Body=json.dumps(german_payload),
)
result = json.loads(response['Body'].read().decode())
Sending requests with HuggingFacePredictor
The Python SageMaker SDK can not be used for deploying Multi-Container Endpoints but can be used to invoke/send requests to those. We will use the HuggingFacePredictor to send requests to the endpoint, where we also pass the TargetContainerHostname as additional information to point to the container, which should receive the request. In our case this is either englishModel or germanModel.
from sagemaker.huggingface import HuggingFacePredictor

# predictor
predictor = HuggingFacePredictor(f"{deployment_name}-ep")

# english request
en_res = predictor.predict(english_payload, initial_args={"TargetContainerHostname":"englishModel"})
print(en_res)

# german request
de_res = predictor.predict(german_payload, initial_args={"TargetContainerHostname":"germanModel"})
print(de_res)
Load testing the multi-container endpoint
As mentioned, we are doing some light load-testing, meaning sending a few alternating requests to the containers and looking at the latency in cloudwatch.
for i in range(1000):
predictor.predict(english_payload, initial_args={"TargetContainerHostname":"englishModel"})
predictor.predict(german_payload, initial_args={"TargetContainerHostname":"germanModel"})
# link to cloudwatch metrics dashboard
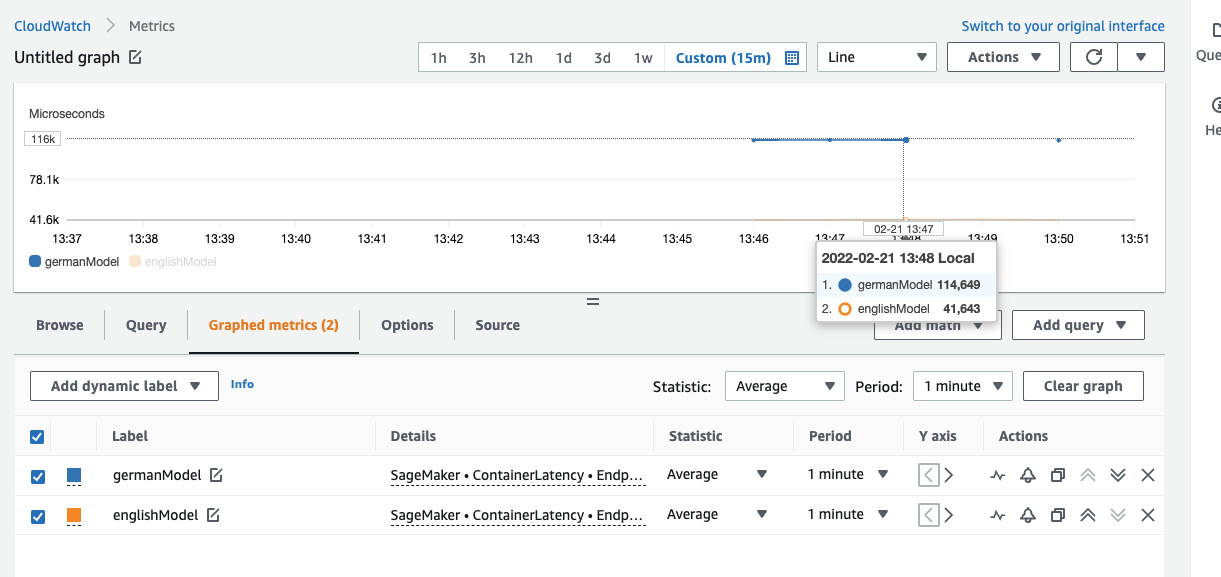
print("https://console.aws.amazon.com/cloudwatch/home?region=us-east-1#metricsV2:graph=~(metrics~(~(~'AWS*2fSageMaker~'ContainerLatency~'EndpointName~'multi-container-sentiment-ep~'ContainerName~'germanModel~'VariantName~'AllTraffic~(visible~false))~(~'...~'englishModel~'.~'.~(visible~false))~(~'.~'Invocations~'.~'.~'.~'.~'.~'.~(stat~'SampleCount))~(~'...~'germanModel~'.~'.~(stat~'SampleCount)))~view~'timeSeries~stacked~false~region~'us-east-1~stat~'Average~period~60~start~'-PT15M~end~'P0D);query=~'*7bAWS*2fSageMaker*2cContainerName*2cEndpointName*2cVariantName*7d")We can see that the latency for the englishModel is around 2x faster than the for the germanModel, which makes sense since the englishModel is a DistilBERT model and the german one is a BERT-base model.
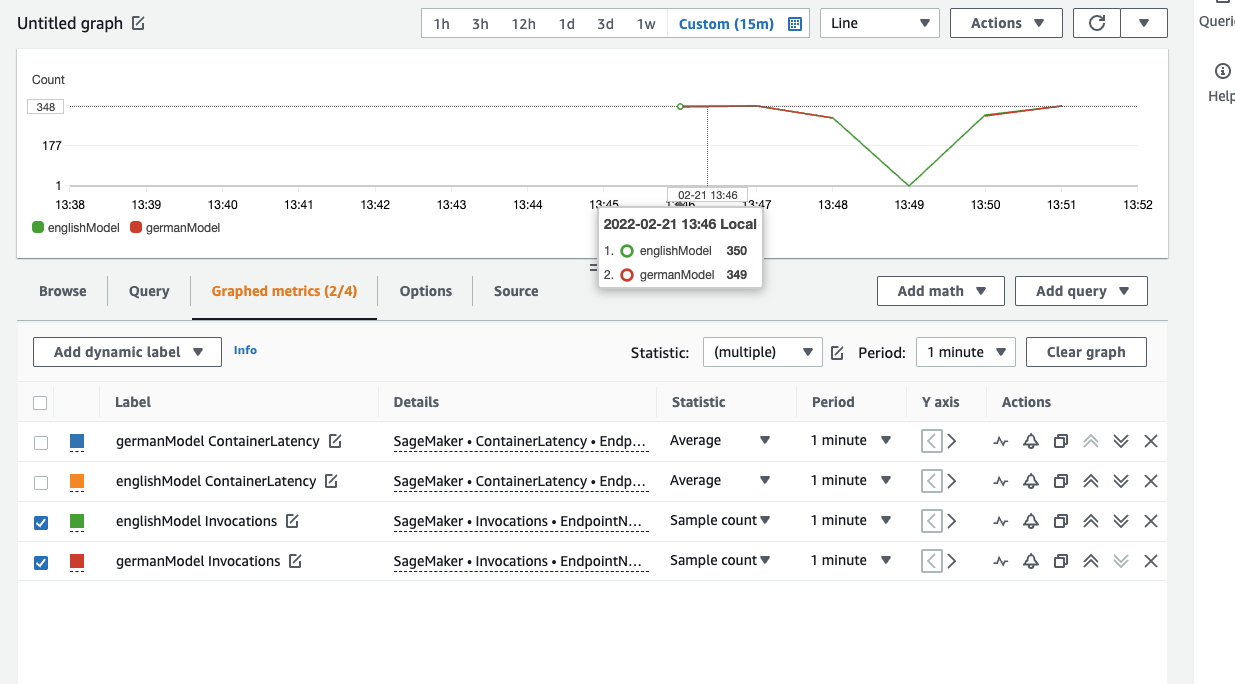
In terms of invocations we can see both enpdoints are invocated the same amount, which makes sense since our test invoked both endpoints alternately.
Delete the Multi-Container Endpoint
predictor.delete_model()
predictor.delete_endpoint()
Conclusion
We successfully deployed two Hugging Face Transformers to Amazon SageMaer for inference using the Multi-Container Endpoint, which allowed using the same instance two host multiple models as a container for inference. Multi-Container Endpoints are a great option to optimize compute utilization and costs for your models. Especially when you have independent inference workloads due to time differences or use-case differences.
You should try Multi-Container Endpoints for your models when you have workloads that are not correlated.
You can find the code here.
Thanks for reading! If you have any questions, feel free to contact me, through Github, or on the forum. You can also connect with me on Twitter or LinkedIn.