How to scale LLM workloads to 20B+ with Amazon SageMaker using Hugging Face and PyTorch FSDP
A couple of weeks ago, Together released an instruction-tuned large language model, fine-tuned for a chat from EleutherAI GPT-NeoX-20B with over 43 million instructions under an Apache-2.0 license! It is the first big open-source alternative to OpenAIs ChatGPT. The model might not perform as well as ChatGPT on your domain-specific prompts and input out of the box, but that's something we can improve through fine-tuning. We are going learn how to use PyTorch FSDP on Amazon SageMaker with Hugging Face to fine-tune LLMs on a multi-node multi-GPU setup
In this tutorial, you will learn how to:
- Setup Environment
- Load and prepare chat dataset
- Fine-tune the GPT model using FSDP on Amazon SageMaker
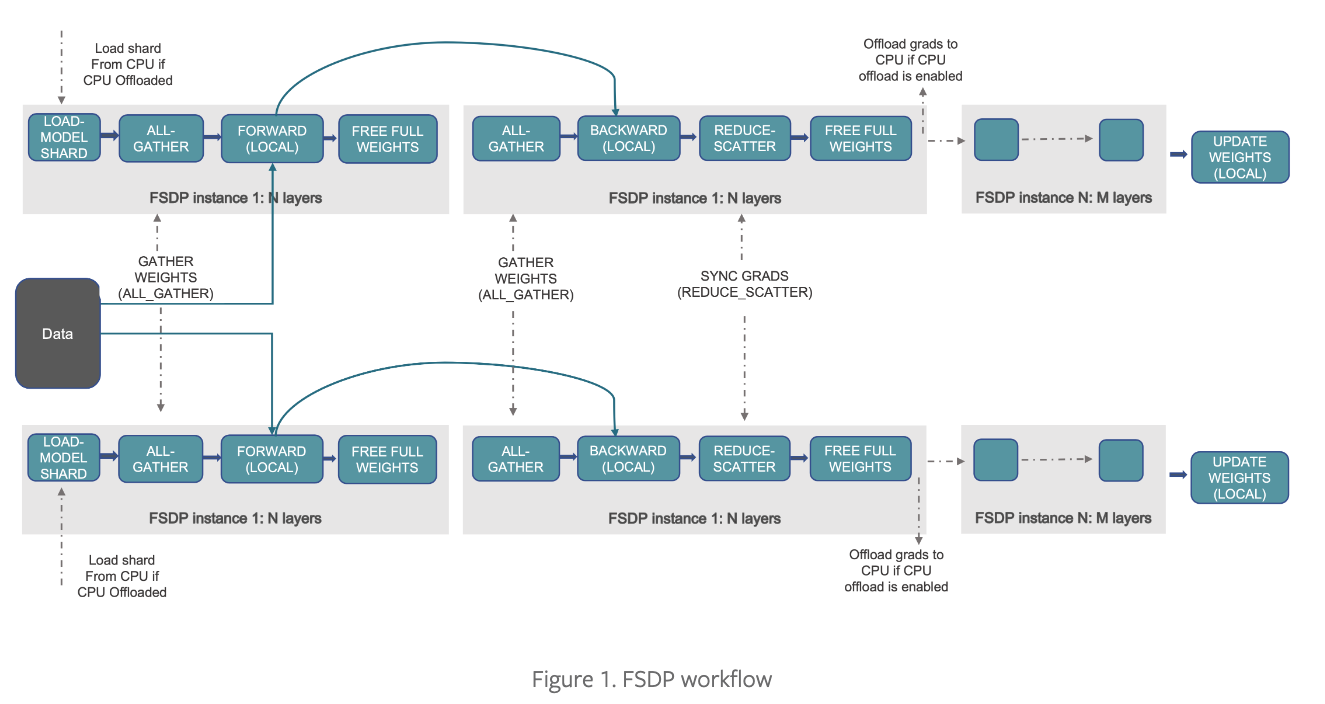
What is PyTorch Fully Sharded Data Parallel (FSDP)?
PyTorch FSDP (Fully Sharded Data Parallel) is an extension of data parallelism that enables efficient large-scale training of LLMs. With FSDP, each GPU stores only a subset of the model and associated optimizer states and gradients and can optionally offload the sharded model parameters to CPUs. This helps maximize the overlap between network communication and model computation, reducing the memory footprint on GPUs.
[Introducing PyTorch Fully Sharded Data Parallel (FSDP) API]
FSDP optimizations include:
- Transformer Wrapping Policy
- Mixed Precision (bf16)
- Activation Checkpointing (Gradient Checkpointing)
- Full Sharding Strategy
PyTorch FSDP is natively integrated into the Hugging Face Trainer, making it easy to adapt and use. You can learn more about PyTorch FSDP in Efficient Large-Scale Training with Pytorch FSDP and AWS or Introducing PyTorch Fully Sharded Data Parallel (FSDP) API blog post.
Now, Let's get started! 🚀
Tutorial
In this tutorial, we will fine-tune the new GPT-NeoXT-Chat-Base-20B on the ELI5 dataset to improve the explanation and question-answering skills of the agent. The ELI5 dataset is an English-language dataset of questions and answers gathered from three subreddits where users ask factual questions requiring paragraph-length or longer answers.
GPT-NeoXT-Chat-Base is a 20B open-source LLM, which makes it hard to fine-tune on a single GPU or even a single Node with multiple GPUs. We are going to use Amazon SageMaker managed training platform as our infrastructure backbone to help us create a multi-node cluster to easily run our distributed training. As instances, we will use 2x p4d.24xlarge instances, which come with 8x NIVIDA A100 40GB GPUs.
Note: You might have to increase and request a quota for those instances.
As distributed training framework, we will use Pytorch FSDP + Hugging Face Transformers Trainer, which will make it super easy to distribute our model and data in a fully sharded way across all our nodes and GPUs.
1. Setup Environment
The first step is installing the Hugging Face Libraries, including transformers, datasets, and sagemaker. Running the following cell will install all the required packages.
!pip install "transformers==4.26.0" "datasets[s3]==2.9.0" "sagemaker>=2.150.0" --upgrade --quietIf you are going to use Sagemaker in a local environment. You need access to an IAM Role with the required permissions for SageMaker. You can find here more about it.
import sagemaker
import boto3
sess = sagemaker.Session()
# sagemaker session bucket -> used for uploading data, models and logs
# sagemaker will automatically create this bucket if it not exists
sagemaker_session_bucket=None
if sagemaker_session_bucket is None and sess is not None:
    # set to default bucket if a bucket name is not given
    sagemaker_session_bucket = sess.default_bucket()

try:
    role = sagemaker.get_execution_role()
except ValueError:
    iam = boto3.client('iam')
    role = iam.get_role(RoleName='sagemaker_execution_role')['Role']['Arn']

sess = sagemaker.Session(default_bucket=sagemaker_session_bucket)

print(f"sagemaker role arn: {role}")
print(f"sagemaker bucket: {sess.default_bucket()}")
print(f"sagemaker session region: {sess.boto_region_name}")
2. Load and prepare the dataset
As the base dataset, we will use the ELI5 dataset, but before fine-tuning the model, we need to preprocess the data. We will create a "chat" version of the dataset by adding <user> and <bot>tokens and add an end-of-sequence <|endoftext|> token to help the model learn to distinguish consecutive examples. Additionally, we create chunks of 2048 tokens (model max length) to avoid unnecessary padding and computing.
The first step is to load our dataset from Hugging Face. The dataset contains 272634 samples for eli5. We will downsample the dataset to 25 000 to make it more realistic for real-world use cases.
from datasets import load_dataset
from transformers import AutoTokenizer

# Load Tokenizer
model_id = "togethercomputer/GPT-NeoXT-Chat-Base-20B"
tokenizer = AutoTokenizer.from_pretrained(model_id)

# Load dataset from huggingface.co
dataset_id = "eli5"
dataset = load_dataset(dataset_id, split="train_eli5")

# downsample dataset to 10k
dataset = dataset.shuffle(42).select(range(25_000))
An ELI5 sample can include multiple answers to a “question”. We will select the answer with the highest user score for our explanation.
Note: This dataset is a good example of using reinforcement learning for training transformers learning to generate answers with higher scores. Let me know if you are interested in an example of that.
The next step is to convert our dataset into a chat version. Here we will follow the instructions on the Model card and add the EOS token.
from random import randint

# dataset template for chat conversation
template=f'''<human>: Explain like I am five: {{question}}
<bot>: {{answer}}{{eos_token}}'''

eos_token = tokenizer.eos_token

def template_dataset(sample):
	sample["text"] = template.format(
														question=sample["title"],
														answer=sample["answers"]["text"][0],
														eos_token=eos_token
													)
	return sample

# apply prompt template per sample
dataset = dataset.map(template_dataset, remove_columns=list(dataset.features))

# print random sample
print(dataset[randint(0, 10_000)])
The last step of the data preparation is to tokenize and chunk our dataset. We convert our inputs (text) to token IDs by tokenizing, which the model can understand. Additionally, we concatenate our dataset samples into chunks of 2048 to avoid unnecessary padding.
from itertools import chain
from functools import partial

# empty list to save remainder from batches to use in next batch
remainder = {"input_ids": [], "attention_mask": []}

def chunk(sample, chunk_length=2048):
    # define global remainder variable to save remainder from batches to use in next batch
    global remainder
    # Concatenate all texts and add remainder from previous batch
    concatenated_examples = {k: list(chain(*sample[k])) for k in sample.keys()}
    concatenated_examples = {k: remainder[k] + concatenated_examples[k] for k in concatenated_examples.keys()}
    # get total number of tokens for batch
    batch_total_length = len(concatenated_examples[list(sample.keys())[0]])

    # get max number of chunks for batch
    if batch_total_length >= chunk_length:
        batch_chunk_length = (batch_total_length // chunk_length) * chunk_length

    # Split by chunks of max_len.
    result = {
        k: [t[i : i + chunk_length] for i in range(0, batch_chunk_length, chunk_length)]
        for k, t in concatenated_examples.items()
    }
    # add remainder to global variable for next batch
    remainder = {k: concatenated_examples[k][batch_chunk_length:] for k in concatenated_examples.keys()}
    # prepare labels
    result["labels"] = result["input_ids"].copy()
    return result

# tokenize and chunk dataset
lm_dataset = dataset.map(
    lambda sample: tokenizer(sample["text"]), batched=True, remove_columns=list(dataset.features)
).map(
    partial(chunk, chunk_length=2048),
    batched=True,
)

# Print total number of samples
print(f"Total number of samples: {len(lm_dataset)}")
After we processed the datasets we are going to use the new FileSystem integration to upload our dataset to S3. We are using the sess.default_bucket(), adjust this if you want to store the dataset in a different S3 bucket. We will use the S3 path later in our training script.
# save train_dataset to s3
training_input_path = f's3://{sess.default_bucket()}/processed/eli-5/train'
lm_dataset.save_to_disk(training_input_path)

print("uploaded data to:")
print(f"training dataset to: {training_input_path}")
Our dataset is now prepared, and we can start fine-tuning our model. 🥳
3. Fine-tune the GPT model using FSDP on Amazon SageMaker
As mentioned in the beginning, we will use Amazon SageMaker and PyTorch FSDP to train our model. Amazon SageMaker makes it easy to create a multi-node cluster to train our model in a distributed manner. Lately, the sagemaker python SDK got support to run training jobs using torchrun, to distribute the script across multiple nodes and GPUs.
To use torchrun to execute our scripts, we only have to define the distribution parameter in our Estimator and set it to {"torch_distributed": {"enabled": True}}. This tells SageMaker to launch our training job with.
torchrun --nnodes 2 --nproc_per_node 8 --master_addr algo-1 --master_port 7777 --node_rank 1 run_clm.py --bf16 True --dataset_path /opt/ml/input/data/training --epochs 3 --fsdp "full_shard auto_wrap" --fsdp_transformer_layer_cls_to_wrap GPTNeoXLayer --gradient_checkpointing True --model_id togethercomputer/GPT-NeoXT-Chat-Base-20B --optimizer adamw_apex_fused --per_device_train_batch_size 2To use FSDP with the Hugging Face Trainer, we need to provide our fsdp strategy as well as the transformer layer policy.
In our example, we will use full shard auto_wrap and GPTNeoXLayeras transformer layer policy. If you run this example and change the model id make sure to also adjust the transformer layer policy.
We prepared a run_clm.py, which implements causal language modeling and accepts our fsdp and other hyperparameters.
To create a sagemaker training job, we create an HuggingFace Estimator and provide all our information. SagMaker takes care of starting and managing all the required ec2 instances for us, provides the correct huggingface container, uploads the provided scripts and downloads the data from our S3 bucket into the container at /opt/ml/input/data. Then, it starts the training job by running.
import time
from sagemaker.huggingface import HuggingFace

# define Training Job Name
job_name = f'huggingface-fsdp-{time.strftime("%Y-%m-%d-%H-%M-%S", time.localtime())}'

# hyperparameters, which are passed into the training job
hyperparameters={
    'model_id': 'togethercomputer/GPT-NeoXT-Chat-Base-20B', # model id from huggingface.co/models
    'dataset_path': '/opt/ml/input/data/training', # path where sagemaker will save training dataset
    'gradient_checkpointing': True, # enable gradient checkpointing
    'bf16': True, # enable mixed precision training
    'optimizer': "adamw_apex_fused", # optimizer
    'per_device_train_batch_size': 2, # batch size per device during training
    'epochs': 3, # number of epochs to train
    'fsdp': '"full_shard auto_wrap"', # fully sharded data parallelism
    'fsdp_transformer_layer_cls_to_wrap': "GPTNeoXLayer", # transformer layer to wrap
}

# estimator
huggingface_estimator = HuggingFace(
    entry_point='run_clm.py',
    source_dir='./scripts',
    instance_type="ml.p4d.24xlarge",
    instance_count=2,
    volume_size=200,
    role=role,
    job_name=job_name,
    transformers_version='4.26.0',
    pytorch_version='1.13.1',
    py_version="py39",
    hyperparameters = hyperparameters,
    distribution={"torch_distributed": {"enabled": True}} # enable torchrun
)
We can now start our training job, with the .fit() method passing our S3 path to the training script.
# define a data input dictonary with our uploaded s3 uris
data = {'training': training_input_path}

# starting the train job with our uploaded datasets as input
huggingface_estimator.fit(data, wait=True)
The training took 9407 seconds, which is about 2.6 hours. The ml.p4d.24xlarge instance we used costs $37.688 per hour. So the total cost for training GPT-NeoXT-Chat-Base-20B is (2.6h * $37.688) * 2 instances which results in $197. We could reduce the cost by using a spot instance or using Parameter Efficient Fine Tuning.
Conclusion
In conclusion, Amazon SageMaker and PyTorch FSDP with Hugging Face Transformers provide an efficient way to train LLMs for various applications. With FSDP and the integration into Hugging Face Transformers, we can train LLMs on a multi-node multi-GPU setup without any engineering investments.
If you're interested in improving the performance of LLMs or even training your own LLM from scratch, you should consider Amazon SageMaker + Hugging Face Transformers as a good option.
Thanks for reading! If you have any questions, feel free to contact me on Twitter or LinkedIn.