Accelerate Vision Transformer (ViT) with Quantization using Optimum
last update: 2022-11-18
In this session, you will learn how to optimize Vision Transformers models using Optimum. The session will show you how to dynamically quantize and optimize a ViT model using Hugging Face Optimum and ONNX Runtime. Hugging Face Optimum is an extension of 🤗 Transformers, providing a set of performance optimization tools enabling maximum efficiency to train and run models on targeted hardware.
Note: dynamic quantization is currently only supported for CPUs, so we will not be utilizing GPUs / CUDA in this session.
By the end of this session, you see how quantization and optimization with Hugging Face Optimum can result in significant increase in model latency while keeping almost 100% of the full-precision model. Furthermore, you’ll see how to easily apply some advanced quantization and optimization techniques shown here so that your models take much less of an accuracy hit than they would otherwise.
You will learn how to:
- Setup Development Environment
- Convert a Hugging Face
Transformersmodel to ONNX for inference - Apply dynamic quantization using
ORTQuantizerfrom Optimum - Test inference with the quantized model
- Evaluate the performance and speed
Let's get started! 🚀
This tutorial was created and run on an c6i.xlarge AWS EC2 Instance.
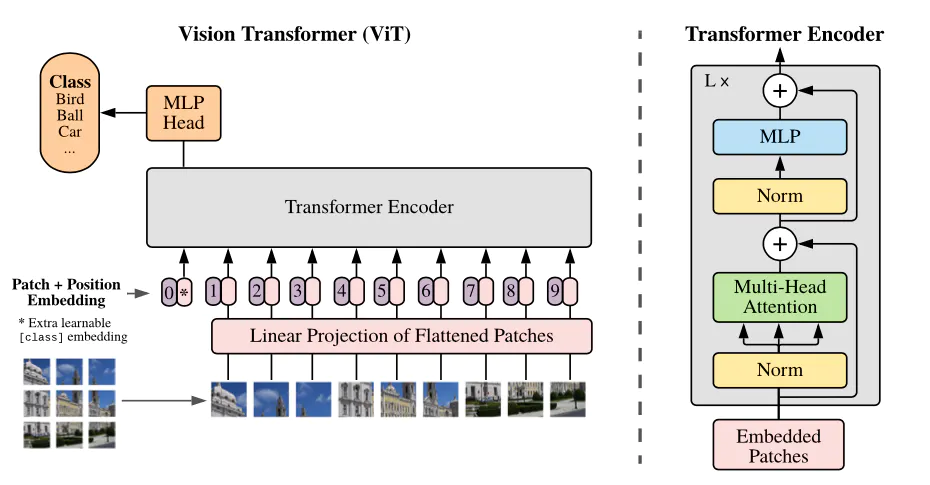
Quick intro: Vision Transformer (ViT) by Google Brain
The Vision Transformer (ViT) is basically BERT, but applied to images. It attains excellent results compared to state-of-the-art convolutional networks. In order to provide images to the model, each image is split into a sequence of fixed-size patches (typically of resolution 16x16 or 32x32), which are linearly embedded. One also adds a [CLS] token at the beginning of the sequence in order to classify images. Next, one adds absolute position embeddings and provides this sequence to the Transformer encoder.
- Paper: https://arxiv.org/abs/2010.11929
- Official repo (in JAX): https://github.com/google-research/vision_transformer
1. Setup Development Environment
Our first step is to install Optimum, along with Evaluate and some other libraries. Running the following cell will install all the required packages for us including Transformers, PyTorch, and ONNX Runtime utilities:
!pip install "optimum[onnxruntime]==1.5.0" evaluate[evaluator] sklearn mkl-include mkl --upgradeIf you want to run inference on a GPU, you can install 🤗 Optimum with
pip install optimum[onnxruntime-gpu].
2. Convert a Hugging Face Transformers model to ONNX for inference
Before we can start qunatizing we need to convert our vanilla transformers model to the onnx format. To do this we will use the new ORTModelForImageClassification class calling the from_pretrained() method with the from_transformers attribute. The model we are using is the a fine-tuned version of google/vit-base-patch16-224-in21k on the beans dataset (nateraw/vit-base-beans) achieving an accuracy of 96.88%.
from optimum.onnxruntime import ORTModelForImageClassification
from transformers import AutoFeatureExtractor
from pathlib import Path


model_id="nateraw/vit-base-beans"
onnx_path = Path("onnx")

# load vanilla transformers and convert to onnx
model = ORTModelForImageClassification.from_pretrained(model_id, from_transformers=True)
preprocessor = AutoFeatureExtractor.from_pretrained(model_id)

# save onnx checkpoint and tokenizer
model.save_pretrained(onnx_path)
preprocessor.save_pretrained(onnx_path)
One neat thing about 🤗 Optimum, is that allows you to run ONNX models with the pipeline() function from 🤗 Transformers. This means that you get all the pre- and post-processing features for free, without needing to re-implement them for each model! Here's how you can run inference with our vanilla ONNX model:
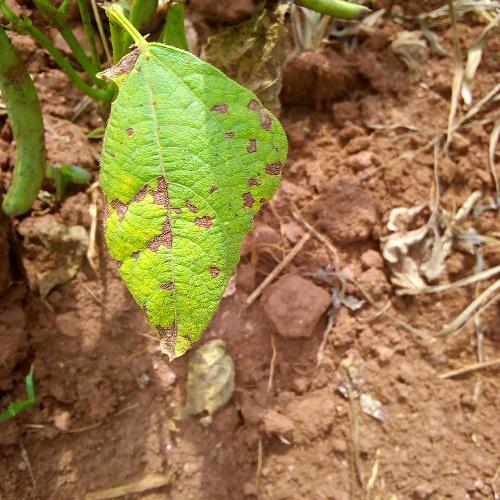
https://datasets-server.huggingface.co/assets/beans/--/default/validation/30/image/image.jpg
from transformers import pipeline

vanilla_clf = pipeline("image-classification", model=model, feature_extractor=preprocessor)
print(vanilla_clf("https://datasets-server.huggingface.co/assets/beans/--/default/validation/30/image/image.jpg"))
If you want to learn more about exporting transformers model check-out Convert Transformers to ONNX with Hugging Face Optimum blog post
3. Apply dynamic quantization using ORTQuantizer from Optimum
The ORTQuantizer can be used to apply dynamic quantization to decrease the size of the model size and accelerate latency and inference.
We use the avx512_vnni config since the instance is powered by an intel ice-lake CPU supporting avx512.
from optimum.onnxruntime import ORTQuantizer
from optimum.onnxruntime.configuration import AutoQuantizationConfig

# create ORTQuantizer and define quantization configuration
dynamic_quantizer = ORTQuantizer.from_pretrained(model)
dqconfig = AutoQuantizationConfig.avx512_vnni(is_static=False, per_channel=False)

# apply the quantization configuration to the model
model_quantized_path = dynamic_quantizer.quantize(
    save_dir=onnx_path,
    quantization_config=dqconfig,
)
Lets quickly check the new model size.
import os

# get model file size
size = os.path.getsize(onnx_path / "model.onnx")/(1024*1024)
quantized_model = os.path.getsize(onnx_path / "model_quantized.onnx")/(1024*1024)

print(f"Model file size: {size:.2f} MB")
print(f"Quantized Model file size: {quantized_model:.2f} MB")
#   Model file size: 330.27 MB
#   Quantized Model file size: 84.50 MB
4. Test inference with the quantized model
Optimum has built-in support for transformers pipelines. This allows us to leverage the same API that we know from using PyTorch and TensorFlow models.
Therefore we can load our quantized model with ORTModelForImageClassification class and transformers pipeline.
from optimum.onnxruntime import ORTModelForImageClassification
from transformers import pipeline, AutoFeatureExtractor

model = ORTModelForImageClassification.from_pretrained(onnx_path, file_name="model_quantized.onnx")
preprocessor = AutoFeatureExtractor.from_pretrained(onnx_path)

q8_clf = pipeline("image-classification", model=model, feature_extractor=preprocessor)
print(q8_clf("https://datasets-server.huggingface.co/assets/beans/--/default/validation/30/image/image.jpg"))
5. Evaluate the performance and speed
To evaluate the model performance and speed are we going to use a the test split of the beans dataset containing only 3 classes ('angular_leaf_spot', 'bean_rust', 'healthy') and 128 images. The evaluation was done by using Huggingface/evaluate a library for easily evaluating machine learning models and datasets.
We evaluated the vanilla model outside of this example using the same evaluator with the vanilla model achieving an accuraccy of 96.88% on our dataset.
from evaluate import evaluator
from datasets import load_dataset

e = evaluator("image-classification")
eval_dataset = load_dataset("beans",split=["test"])[0]

results = e.compute(
    model_or_pipeline=q8_clf,
    data=eval_dataset,
    metric="accuracy",
    input_column="image",
    label_column="labels",
    label_mapping=model.config.label2id,
    strategy="simple",
)

print(f"Vanilla model: 96.88%")
print(f"Quantized model: {results['accuracy']*100:.2f}%")
print(f"The quantized model achieves {round(results['accuracy']/0.9688,4)*100:.2f}% accuracy of the fp32 model")

#    Vanilla model: 96.88%
#    Quantized model: 96.88%
#    The quantized model achieves 99.99% accuracy of the fp32 model
Okay, now let's test the performance (latency) of our quantized model. We are going to use a the beans sample for the benchmark. To keep it simple, we are going to use a python loop and calculate the avg,mean & p95 latency for our vanilla model and for the quantized model.
from time import perf_counter
import numpy as np
from PIL import Image
import requests
payload="https://datasets-server.huggingface.co/assets/beans/--/default/validation/30/image/image.jpg"
def measure_latency(pipe):
# prepare date
image = Image.open(requests.get(payload, stream=True).raw)
inputs = pipe.feature_extractor(images=image, return_tensors="pt")
latencies = []
# warm up
for _ in range(10):
_ = pipe.model(**inputs)
# Timed run
for _ in range(200):
start_time = perf_counter()
_ = pipe.model(**inputs)
latency = perf_counter() - start_time
latencies.append(latency)
# Compute run statistics
time_avg_ms = 1000 * np.mean(latencies)
time_std_ms = 1000 * np.std(latencies)
time_p95_ms = 1000 * np.percentile(latencies,95)
return f"P95 latency (ms) - {time_p95_ms}; Average latency (ms) - {time_avg_ms:.2f} +\- {time_std_ms:.2f};", time_p95_ms
vanilla_model=measure_latency(vanilla_clf)
quantized_model=measure_latency(q8_clf)
print(f"Vanilla model: {vanilla_model[0]}")
print(f"Quantized model: {quantized_model[0]}")
print(f"Improvement through quantization: {round(vanilla_model[1]/quantized_model[1],2)}x")
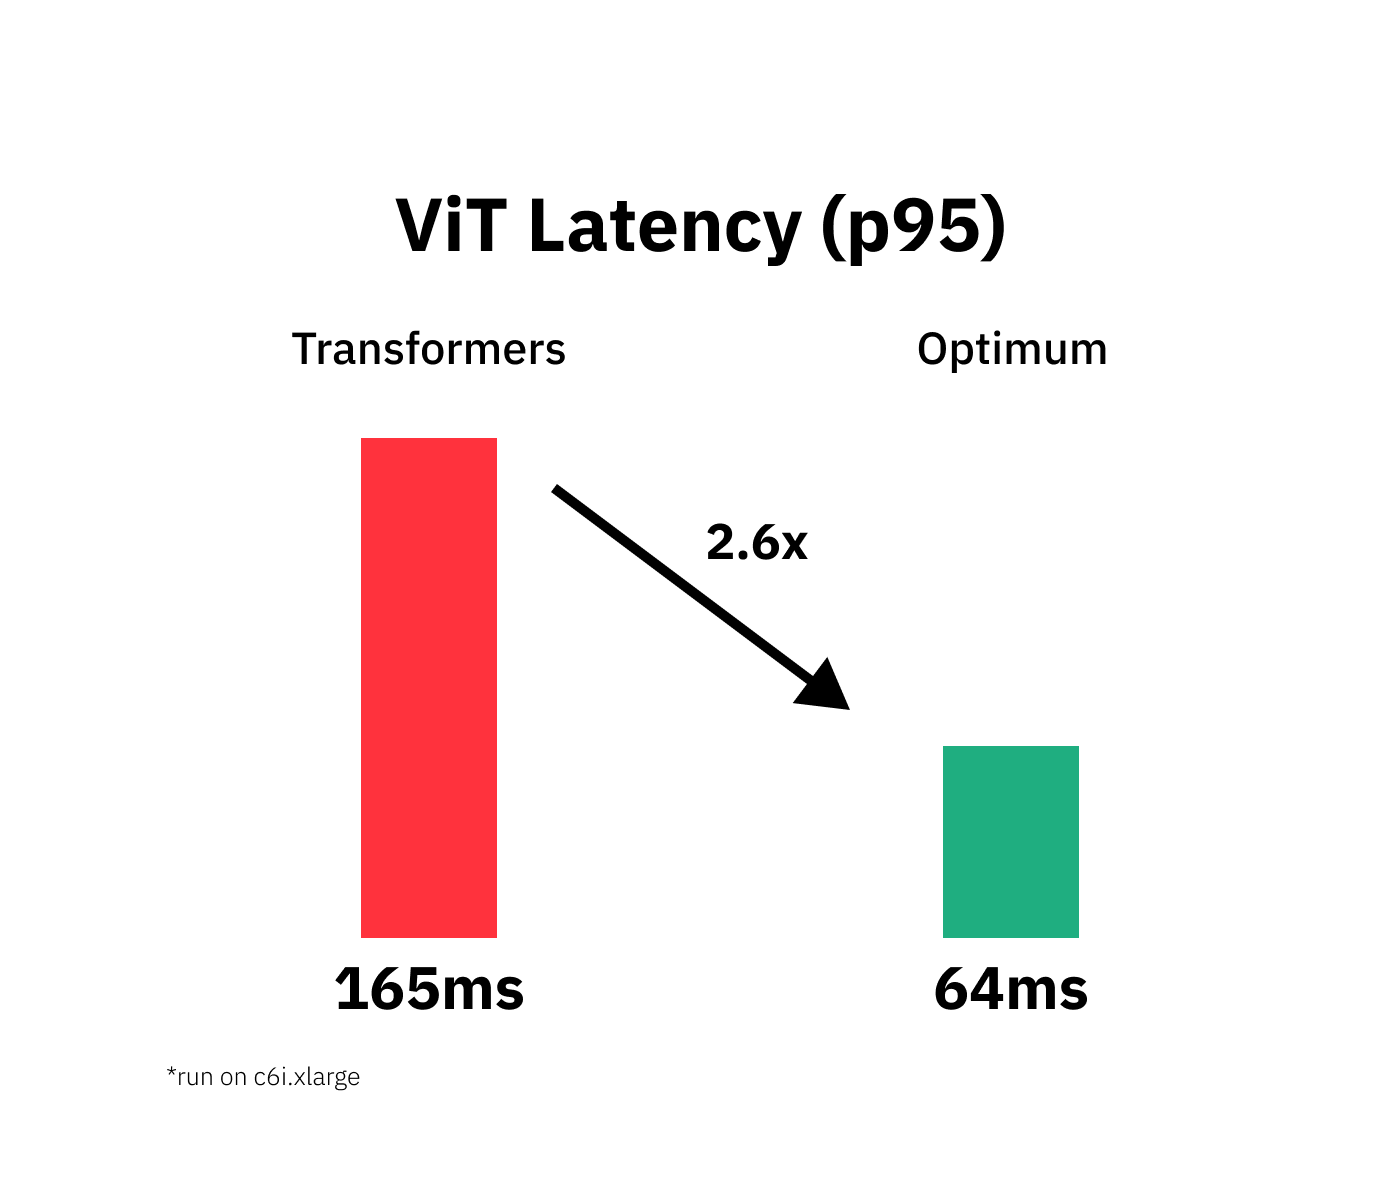
# Vanilla model: P95 latency (ms) - 165.06651640004284; Average latency (ms) - 149.00 +\- 11.22;
# Quantized model: P95 latency (ms) - 63.56140074997256; Average latency (ms) - 62.81 +\- 2.18;
# Improvement through quantization: 2.6xWe managed to accelerate our model latency from 165ms to 64ms or 2.6x while keeping 99.99% of the accuracy.
Conclusion
We successfully quantized our vanilla Transformers model with Hugging Face and managed to accelerate our model latency 165ms to 64ms or 2.6x while keeping 99.99% of the accuracy.
But I have to say that this isn't a plug and play process you can transfer to any Transformers model, task or dataset.