Optimizing Transformers with Hugging Face Optimum
last update: 2022-11-18
In this session, you will learn how to optimize Hugging Face Transformers models using Optimum. The session will show you how to dynamically quantize and optimize a DistilBERT model using Hugging Face Optimum and ONNX Runtime. Hugging Face Optimum is an extension of 🤗 Transformers, providing a set of performance optimization tools enabling maximum efficiency to train and run models on targeted hardware.
Note: dynamic quantization is currently only supported for CPUs, so we will not be utilizing GPUs / CUDA in this session.
By the end of this session, you see how quantization and optimization with Hugging Face Optimum can result in significant increase in model latency while keeping almost 100% of the full-precision model. Furthermore, you’ll see how to easily apply some advanced quantization and optimization techniques shown here so that your models take much less of an accuracy hit than they would otherwise.
You will learn how to:
- Setup Development Environment
- Convert a Hugging Face
Transformersmodel to ONNX for inference - Apply graph optimization techniques to the ONNX model
- Apply dynamic quantization using
ORTQuantizerfrom Optimum - Test inference with the quantized model
- Evaluate the performance and speed
- Push the quantized model to the Hub
- Load and run inference with a quantized model from the hub
Let's get started! 🚀
This tutorial was created and run on an c6i.xlarge AWS EC2 Instance.
1. Setup Development Environment
Our first step is to install Optimum, along with Evaluate and some other libraries. Running the following cell will install all the required packages for us including Transformers, PyTorch, and ONNX Runtime utilities:
!pip install "optimum[onnxruntime]==1.5.0" evaluate[evaluator] sklearn mkl-include mkl --upgradeIf you want to run inference on a GPU, you can install 🤗 Optimum with
pip install optimum[onnxruntime-gpu].
2. Convert a Hugging Face Transformers model to ONNX for inference
Before we can start qunatizing we need to convert our vanilla transformers model to the onnx format. To do this we will use the new ORTModelForSequenceClassification class calling the from_pretrained() method with the from_transformers attribute. The model we are using is the optimum/distilbert-base-uncased-finetuned-banking77 a fine-tuned DistilBERT model on the Banking77 dataset achieving an Accuracy score of 92.5 and as the feature (task) text-classification.
from optimum.onnxruntime import ORTModelForSequenceClassification
from transformers import AutoTokenizer
from pathlib import Path


model_id="optimum/distilbert-base-uncased-finetuned-banking77"
dataset_id="banking77"
onnx_path = Path("onnx")

# load vanilla transformers and convert to onnx
model = ORTModelForSequenceClassification.from_pretrained(model_id, from_transformers=True)
tokenizer = AutoTokenizer.from_pretrained(model_id)

# save onnx checkpoint and tokenizer
model.save_pretrained(onnx_path)
tokenizer.save_pretrained(onnx_path)
One neat thing about 🤗 Optimum, is that allows you to run ONNX models with the pipeline() function from 🤗 Transformers. This means that you get all the pre- and post-processing features for free, without needing to re-implement them for each model! Here's how you can run inference with our vanilla ONNX model:
from transformers import pipeline

vanilla_clf = pipeline("text-classification", model=model, tokenizer=tokenizer)
vanilla_clf("Could you assist me in finding my lost card?")
#[{'label': 'lost_or_stolen_card', 'score': 0.9664045572280884}]
If you want to learn more about exporting transformers model check-out Convert Transformers to ONNX with Hugging Face Optimum blog post
3. Apply graph optimization techniques to the ONNX model
Graph optimizations are essentially graph-level transformations, ranging from small graph simplifications and node eliminations to more complex node fusions and layout optimizations. Examples of graph optimizations include:
- Constant folding: evaluate constant expressions at compile time instead of runtime
- Redundant node elimination: remove redundant nodes without changing graph structure
- Operator fusion: merge one node (i.e. operator) into another so they can be executed together

If you want to learn more about graph optimization you take a look at the ONNX Runtime documentation. We are going to first optimize the model and then dynamically quantize to be able to use transformers specific operators such as QAttention for quantization of attention layers.
To apply graph optimizations to our ONNX model, we will use the ORTOptimizer(). The ORTOptimizer makes it with the help of a OptimizationConfig easy to optimize. The OptimizationConfig is the configuration class handling all the ONNX Runtime optimization parameters.
from optimum.onnxruntime import ORTOptimizer
from optimum.onnxruntime.configuration import OptimizationConfig

# create ORTOptimizer and define optimization configuration
optimizer = ORTOptimizer.from_pretrained(model)
optimization_config = OptimizationConfig(optimization_level=99) # enable all optimizations

# apply the optimization configuration to the model
optimizer.optimize(
    save_dir=onnx_path,
    optimization_config=optimization_config,
)
To test performance we can use the ORTModelForSequenceClassification class again and provide an additional file_name parameter to load our optimized model. (This also works for models available on the hub).
from transformers import pipeline

# load optimized model
model = ORTModelForSequenceClassification.from_pretrained(onnx_path, file_name="model_optimized.onnx")

# create optimized pipeline
optimized_clf = pipeline("text-classification", model=model, tokenizer=tokenizer)
optimized_clf("Could you assist me in finding my lost card?")
4. Apply dynamic quantization using ORTQuantizer from Optimum
After we have optimized our model we can accelerate it even more by quantizing it using the ORTQuantizer. The ORTQuantizer can be used to apply dynamic quantization to decrease the size of the model size and accelerate latency and inference.
We use the avx512_vnni config since the instance is powered by an intel ice-lake CPU supporting avx512.
from optimum.onnxruntime import ORTQuantizer
from optimum.onnxruntime.configuration import AutoQuantizationConfig

# create ORTQuantizer and define quantization configuration
dynamic_quantizer = ORTQuantizer.from_pretrained(model)
dqconfig = AutoQuantizationConfig.avx512_vnni(is_static=False, per_channel=False)

# apply the quantization configuration to the model
model_quantized_path = dynamic_quantizer.quantize(
    save_dir=onnx_path,
    quantization_config=dqconfig,
)
Lets quickly check the new model size.
import os

# get model file size
size = os.path.getsize(onnx_path / "model_optimized.onnx")/(1024*1024)
quantized_model = os.path.getsize(onnx_path / "model_optimized_quantized.onnx")/(1024*1024)

print(f"Model file size: {size:.2f} MB")
print(f"Quantized Model file size: {quantized_model:.2f} MB")
5. Test inference with the quantized model
Optimum has built-in support for transformers pipelines. This allows us to leverage the same API that we know from using PyTorch and TensorFlow models.
Therefore we can load our quantized model with ORTModelForSequenceClassification class and transformers pipeline.
from optimum.onnxruntime import ORTModelForSequenceClassification
from transformers import pipeline, AutoTokenizer

model = ORTModelForSequenceClassification.from_pretrained(onnx_path,file_name="model_optimized_quantized.onnx")
tokenizer = AutoTokenizer.from_pretrained(onnx_path)

q8_clf = pipeline("text-classification",model=model, tokenizer=tokenizer)

q8_clf("What is the exchange rate like on this app?")
6. Evaluate the performance and speed
We can now leverage the map function of datasets to iterate over the validation set of squad 2 and run prediction for each data point. Therefore we write a evaluate helper method which uses our pipelines and applies some transformation to work with the squad v2 metric.
from evaluate import evaluator
from datasets import load_dataset

eval = evaluator("text-classification")
eval_dataset = load_dataset("banking77", split="test")

results = eval.compute(
    model_or_pipeline=q8_clf,
    data=eval_dataset,
    metric="accuracy",
    input_column="text",
    label_column="label",
    label_mapping=model.config.label2id,
    strategy="simple",
)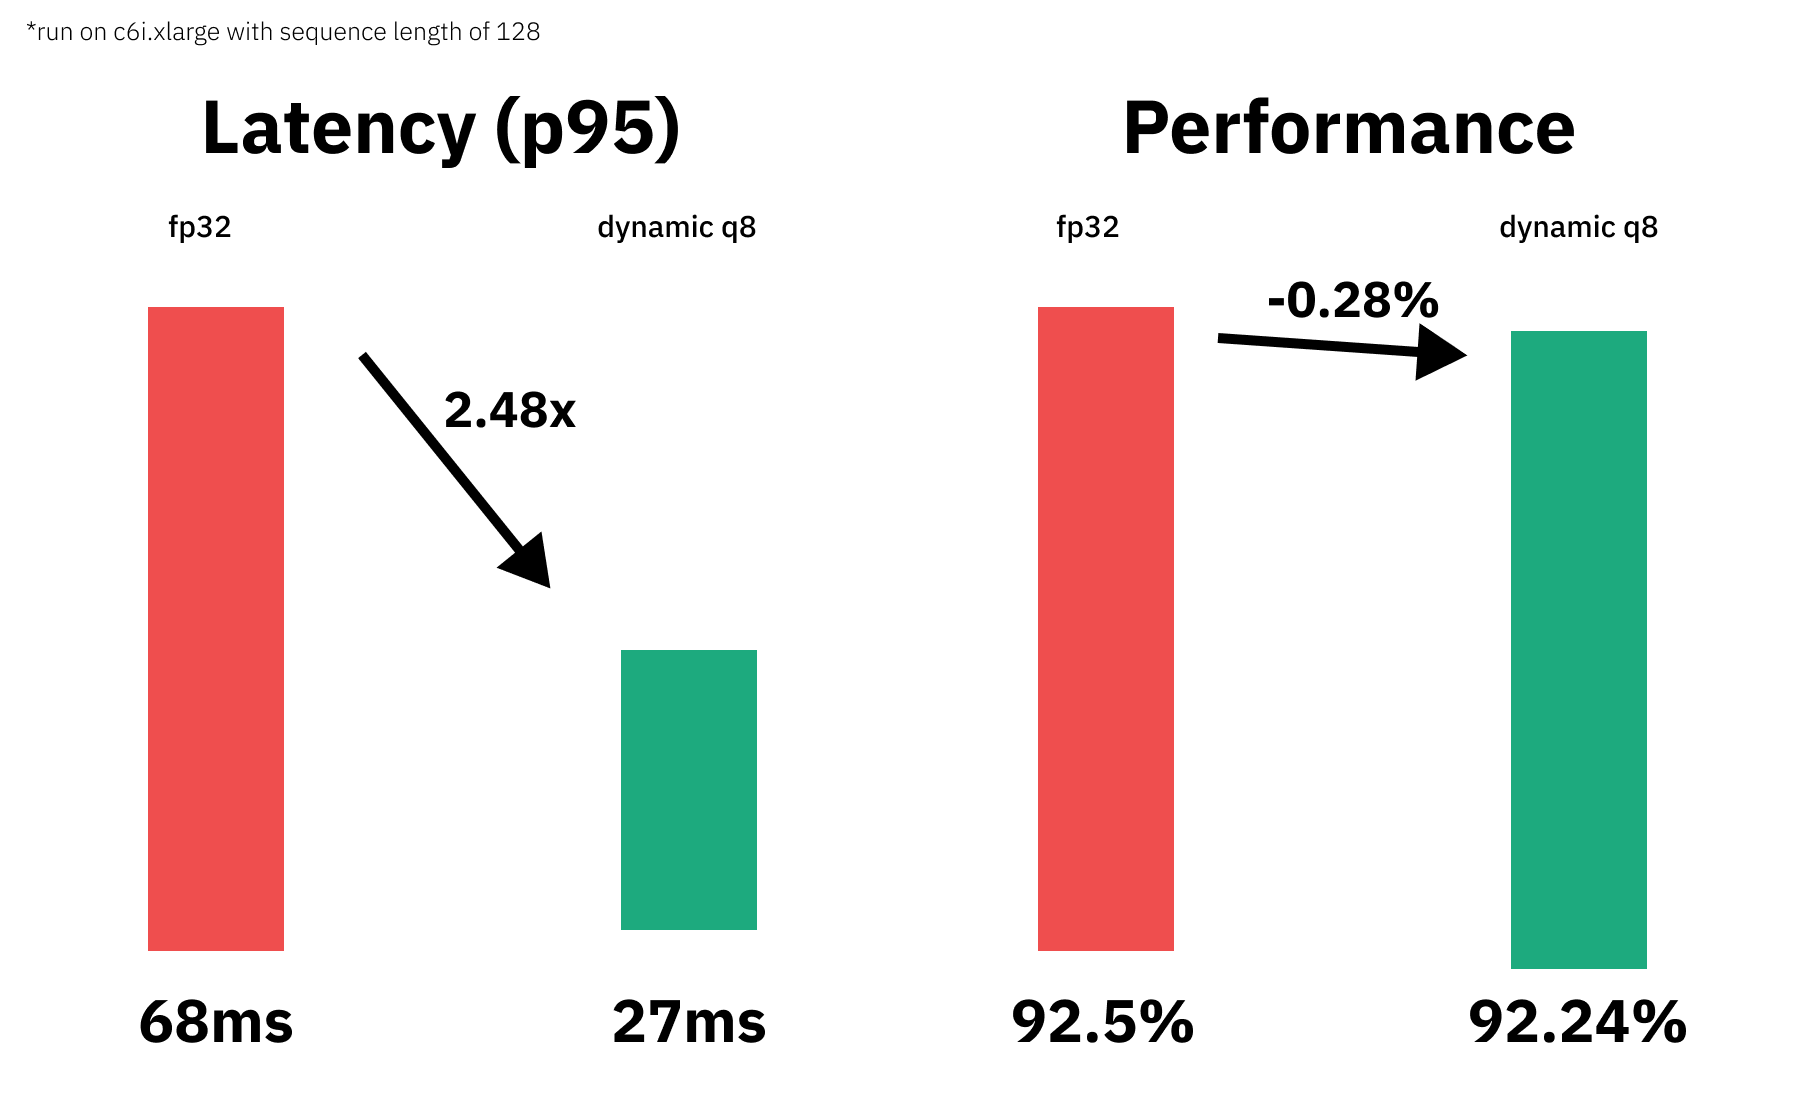
print(results)print(f"Vanilla model: 92.5%")
print(f"Quantized model: {results['accuracy']*100:.2f}%")
print(f"The quantized model achieves {round(results['accuracy']/0.925,4)*100:.2f}% accuracy of the fp32 model")
# Vanilla model: 92.5%
# Quantized model: 92.24%
# The quantized model achieves 99.72% accuracy of the fp32 modelOkay, now let's test the performance (latency) of our quantized model. We are going to use a payload with a sequence length of 128 for the benchmark. To keep it simple, we are going to use a python loop and calculate the avg,mean & p95 latency for our vanilla model and for the quantized model.
from time import perf_counter
import numpy as np

payload="Hello my name is Philipp. I am getting in touch with you because i didn't get a response from you. What do I need to do to get my new card which I have requested 2 weeks ago? Please help me and answer this email in the next 7 days. Best regards and have a nice weekend "*2
print(f'Payload sequence length: {len(tokenizer(payload)["input_ids"])}')

def measure_latency(pipe):
    latencies = []
    # warm up
    for _ in range(10):
        _ = pipe(payload)
    # Timed run
    for _ in range(300):
        start_time = perf_counter()
        _ =  pipe(payload)
        latency = perf_counter() - start_time
        latencies.append(latency)
    # Compute run statistics
    time_avg_ms = 1000 * np.mean(latencies)
    time_std_ms = 1000 * np.std(latencies)
    time_p95_ms = 1000 * np.percentile(latencies,95)
    return f"P95 latency (ms) - {time_p95_ms}; Average latency (ms) - {time_avg_ms:.2f} +\- {time_std_ms:.2f};", time_p95_ms


vanilla_model=measure_latency(vanilla_clf)
quantized_model=measure_latency(q8_clf)

print(f"Vanilla model: {vanilla_model[0]}")
print(f"Quantized model: {quantized_model[0]}")
print(f"Improvement through quantization: {round(vanilla_model[1]/quantized_model[1],2)}x")

# Payload sequence length: 128
# Vanilla model: P95 latency (ms) - 68.4711932000539; Average latency (ms) - 56.28 +\- 6.66;
# Quantized model: P95 latency (ms) - 27.554391949979617; Average latency (ms) - 27.29 +\- 0.15;
# Improvement through quantization: 2.48x
We managed to accelerate our model latency from 68.4ms to 27.55ms or 2.48x while keeping 99.72% of the accuracy.
7. Push the quantized model to the Hub
The Optimum model classes like ORTModelForSequenceClassification are integrated with the Hugging Face Model Hub, which means you can not only load model from the Hub, but also push your models to the Hub with push_to_hub() method. That way we can now save our qunatized model on the Hub to be for example used inside our inference API.
We have to make sure that we are also saving the tokenizer as well as the config.json to have a good inference experience.
If you haven't logged into the huggingface hub yet you can use the notebook_login to do so.
from huggingface_hub import notebook_login

notebook_login()
After we have configured our hugging face hub credentials we can push the model.
from transformers import AutoTokenizer
from optimum.onnxruntime import ORTModelForSequenceClassification

tmp_store_directory="onnx_hub_repo"
repository_id="distilbert-onnx-banking77"

model.save_pretrained(tmp_store_directory)
tokenizer.save_pretrained(tmp_store_directory)

model.push_to_hub(tmp_store_directory,
                  repository_id=repository_id,
                  use_auth_token=True
                  )
8. Load and run inference with a quantized model from the hub
This step serves as a demonstration of how you could use optimum in your api to load and use our qunatized model.
from optimum.onnxruntime import ORTModelForSequenceClassification
from transformers import pipeline, AutoTokenizer

model = ORTModelForSequenceClassification.from_pretrained("philschmid/distilbert-onnx-banking77")
tokenizer = AutoTokenizer.from_pretrained("philschmid/distilbert-onnx-banking77")

remote_clx = pipeline("text-classification",model=model, tokenizer=tokenizer)

remote_clx("What is the exchange rate like on this app?")
Conclusion
We successfully quantized our vanilla Transformers model with Hugging Face Optimum and managed to decrease our model latency from 68.4ms to 27.55ms or 2.48x while keeping 99.72% of the accuracy.
Thanks for reading. If you have any questions, feel free to contact me, through Github, or on the forum. You can also connect with me on Twitter or LinkedIn.