MLOps: Using the Hugging Face Hub as model registry with Amazon SageMaker
The Hugging Face Hub is the largest collection of models, datasets, and metrics in order to democratize and advance AI for everyone 🚀. The Hugging Face Hub works as a central place where anyone can share and explore models and datasets.
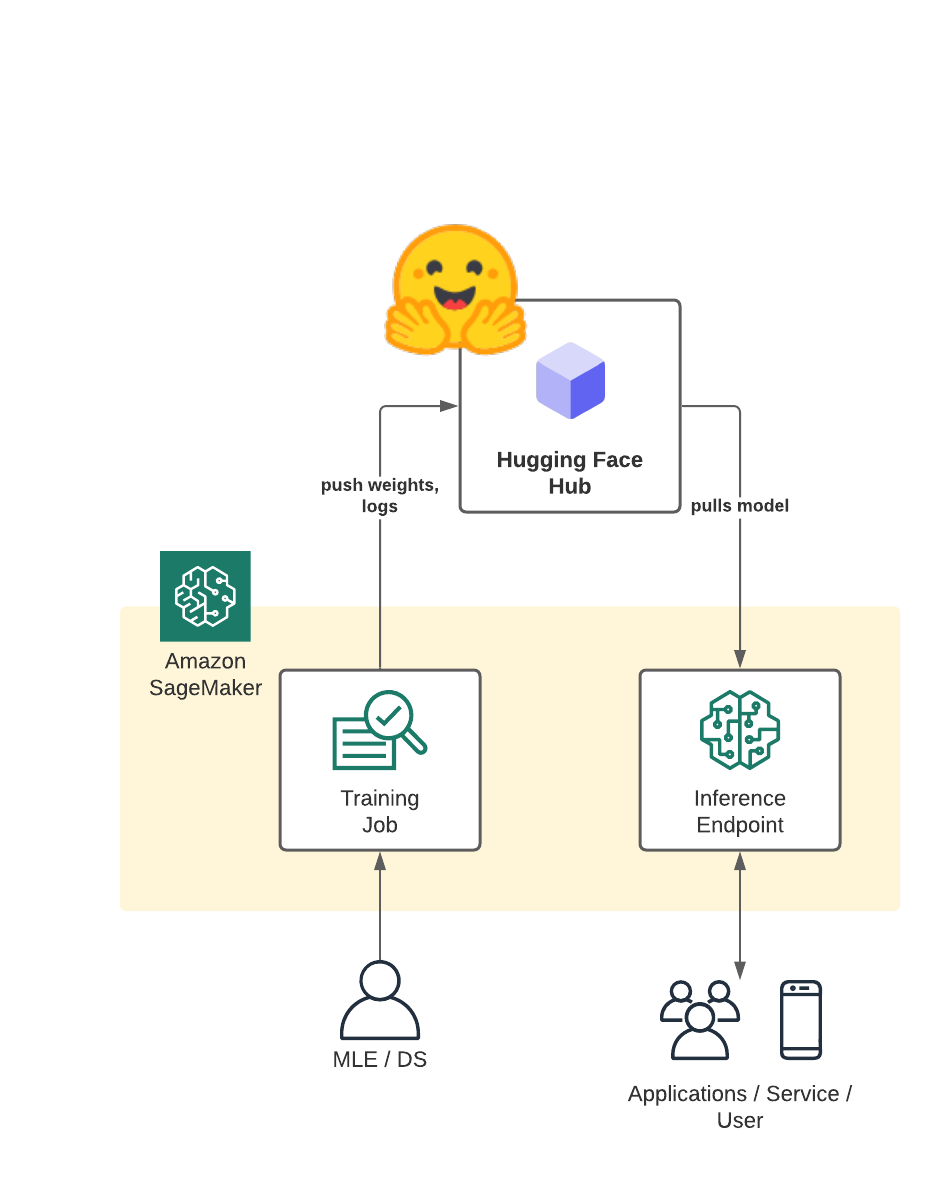
In this blog post you will learn how to automatically save your model weights, logs, and artifacts to the Hugging Face Hub using Amazon SageMaker and how to deploy the model afterwards for inference. 🏎
This will allow you to use the Hugging Face Hub as the backbone of your model-versioning, -storage & -management 👔
You will be able to easily share your models inside your own private organization or with the whole Hugging Face community without heavy lifting due to build in permission and access control features.🔒
In this demo, we will use the Hugging Faces transformers and datasets library together with a custom Amazon sagemaker-sdk extension to fine-tune a pre-trained transformer for multi-class text classification. In particular, the pre-trained model will be fine-tuned using the emotion dataset. To get started, we need to set up the environment with a few prerequisite steps, for permissions, configurations, and so on.
NOTE: You can run this demo in Sagemaker Studio, your local machine or Sagemaker Notebook Instances
Development Environment and Permissions
Note: we only install the required libraries from Hugging Face and AWS. You also need PyTorch or Tensorflow, if you haven´t it installed
!pip install "sagemaker>=2.69.0" "transformers==4.12.3" --upgrade
# using older dataset due to incompatibility of sagemaker notebook & aws-cli with > s3fs and fsspec to >= 2021.10
!pip install "datasets==1.13" --upgradeimport sagemaker
assert sagemaker.__version__ >= "2.69.0"Permissions
If you are going to use Sagemaker in a local environment. You need access to an IAM Role with the required permissions for Sagemaker. You can find here more about it.
import sagemaker

sess = sagemaker.Session()
# sagemaker session bucket -> used for uploading data, models and logs
# sagemaker will automatically create this bucket if it not exists
sagemaker_session_bucket=None
if sagemaker_session_bucket is None and sess is not None:
    # set to default bucket if a bucket name is not given
    sagemaker_session_bucket = sess.default_bucket()

role = sagemaker.get_execution_role()
sess = sagemaker.Session(default_bucket=sagemaker_session_bucket)

print(f"sagemaker role arn: {role}")
print(f"sagemaker bucket: {sess.default_bucket()}")
print(f"sagemaker session region: {sess.boto_region_name}")
Preprocessing
We are using the datasets library to download and preprocess the emotion dataset. After preprocessing, the dataset will be uploaded to our sagemaker_session_bucket to be used within our training job. The emotion dataset consists of 16000 training examples, 2000 validation examples, and 2000 testing examples.
Tokenization
from datasets import load_dataset
from transformers import AutoTokenizer

# tokenizer used in preprocessing
tokenizer_name = 'distilbert-base-uncased'

# dataset used
dataset_name = 'emotion'

# s3 key prefix for the data
s3_prefix = 'samples/datasets/emotion'# download tokenizer
tokenizer = AutoTokenizer.from_pretrained(tokenizer_name)
# tokenizer helper function
def tokenize(batch):
return tokenizer(batch['text'], padding='max_length', truncation=True)
# load dataset
train_dataset, test_dataset = load_dataset(dataset_name, split=['train', 'test'])
# tokenize dataset
train_dataset = train_dataset.map(tokenize, batched=True)
test_dataset = test_dataset.map(tokenize, batched=True)
# set format for pytorch
train_dataset = train_dataset.rename_column("label", "labels")
train_dataset.set_format('torch', columns=['input_ids', 'attention_mask', 'labels'])
test_dataset = test_dataset.rename_column("label", "labels")
test_dataset.set_format('torch', columns=['input_ids', 'attention_mask', 'labels'])Uploading data to sagemaker_session_bucket
After we processed the datasets we are going to use the new FileSystem integration to upload our dataset to S3.
import botocore
from datasets.filesystems import S3FileSystem

s3 = S3FileSystem()

# save train_dataset to s3
training_input_path = f's3://{sess.default_bucket()}/{s3_prefix}/train'
train_dataset.save_to_disk(training_input_path, fs=s3)

# save test_dataset to s3
test_input_path = f's3://{sess.default_bucket()}/{s3_prefix}/test'
test_dataset.save_to_disk(test_input_path, fs=s3)
Creating an Estimator and start a training job
List of supported models: https://huggingface.co/models?library=pytorch,transformers&sort=downloads
setting up push_to_hub for our model.
The train.py scripts implements the push_to_hub using the Trainer and TrainingArguments. To push our model to the Hub we need to define the push_to_hub. hyperparameter and set it to True and provide out Hugging Face Token. Additionally, we can configure the repository name and saving strategy using the hub_model_id, hub_strategy.
You can find documentation to those parameters here.
We are going to provide our HF Token securely with out exposing it to the public using notebook_login from the huggingface_hub SDK.
But be careful your token will still be visible insight the logs of the training job. If you run huggingface_estimator.fit(...,wait=True) you will see the token in the logs.
A better way of providing your HF_TOKEN to your training jobs would be using AWS Secret Manager
You can also directly find your token at https://hf.co/settings/token.
from huggingface_hub import notebook_login

notebook_login()
Now we can use the HfFolder.get_token() to dynamically load our Token from disk and use it as Hyperparameter. The train.py script can be found in the Github repository.
from sagemaker.huggingface import HuggingFace
from huggingface_hub import HfFolder
import time

# hyperparameters, which are passed into the training job
hyperparameters={'epochs': 1,                                    # number of training epochs
                 'train_batch_size': 32,                         # batch size for training
                 'eval_batch_size': 64,                          # batch size for evaluation
                 'learning_rate': 3e-5,                          # learning rate used during training
                 'model_id':'distilbert-base-uncased',           # pre-trained model
                 'fp16': True,                                   # Whether to use 16-bit (mixed) precision training
                 'push_to_hub': True,                            # Defines if we want to push the model to the hub
                 'hub_model_id': 'sagemaker-distilbert-emotion', # The model id of the model to push to the hub
                 'hub_strategy': 'every_save',                   # The strategy to use when pushing the model to the hub
                 'hub_token': HfFolder.get_token()               # HuggingFace token to have permission to push
                }

# define Training Job Name
job_name = f'push-to-hub-sample-{time.strftime("%Y-%m-%d-%H-%M-%S", time.localtime())}'

# create the Estimator
huggingface_estimator = HuggingFace(
    entry_point          = 'train.py',        # fine-tuning script used in training jon
    source_dir           = './scripts',       # directory where fine-tuning script is stored
    instance_type        = 'ml.p3.2xlarge',   # instances type used for the training job
    instance_count       = 1,                 # the number of instances used for training
    base_job_name        = job_name,          # the name of the training job
    role                 = role,              # Iam role used in training job to access AWS ressources, e.g. S3
    transformers_version = '4.12',           # the transformers version used in the training job
    pytorch_version      = '1.9',           # the pytorch_version version used in the training job
    py_version           = 'py38',            # the python version used in the training job
    hyperparameters      = hyperparameters,   # the hyperparameter used for running the training job
)
After we defined our Hyperparameter and Estimator we can start the training job.
# define a data input dictonary with our uploaded s3 uris
data = {
    'train': training_input_path,
    'test': test_input_path
}

# starting the train job with our uploaded datasets as input
# setting wait to False to not expose the HF Token
huggingface_estimator.fit(data, wait=False)
Since we set wait=False to hide the logs we can use a waiter to see when our training job is done.
# adding waiter to see when training is done
waiter = huggingface_estimator.sagemaker_session.sagemaker_client.get_waiter('training_job_completed_or_stopped')
waiter.wait(TrainingJobName=huggingface_estimator.latest_training_job.name)
Accessing the model on hf.co/models
we can access the model on hf.co/models using the hub_model_id and our username.
from huggingface_hub import HfApi

whoami = HfApi().whoami()
username = whoami['name']

print(f"https://huggingface.co/{username}/{hyperparameters['hub_model_id']}")

#     https://huggingface.co/philschmid/sagemaker-distilbert-emotion
Deploying the model from Hugging Face to a SageMaker Endpoint
To deploy our model to Amazon SageMaker we can create a HuggingFaceModel and provide the Hub configuration (HF_MODEL_ID & HF_TASK) to deploy it. Alternatively, we can use the the hugginface_estimator to deploy our model from S3 with huggingface_estimator.deploy().
from sagemaker.huggingface import HuggingFaceModel
import sagemaker

role = sagemaker.get_execution_role()
# Hub Model configuration. https://huggingface.co/models
hub = {
	'HF_MODEL_ID':f"{username}/{hyperparameters['hub_model_id']}",
	'HF_TASK':'text-classification'
}

# create Hugging Face Model Class
huggingface_model = HuggingFaceModel(
	transformers_version='4.12',
	pytorch_version='1.9',
	py_version='py38',
	env=hub,
	role=role,
)

# deploy model to SageMaker Inference
predictor = huggingface_model.deploy(
	initial_instance_count=1, # number of instances
	instance_type='ml.m5.xlarge' # ec2 instance type
)
Then, we use the returned predictor object to call the endpoint.
sentiment_input= {"inputs": "Winter is coming and it will be dark soon."}

predictor.predict(sentiment_input)
Finally, we delete the inference endpoint.
predictor.delete_endpoint()Conclusion
With the push_to_hub integration of the Trainer API we were able to automatically push our model weights and logs based on the hub_strategy to the Hugging Face Hub. With this we benefit from automatic model versioning through the git system and build in permission and access control features.
The combination of using Amazon SageMaker with the Hugging Face Hub allows Machine Learning Teams to easily collaborate across Regions and Accounts using the private and secure Organization to manage, monitor and deploy their own models into production.
You can find the code here and feel free open a thread the forum.
Thanks for reading. If you have any questions, feel free to contact me, through Github, or on the forum. You can also connect with me on Twitter or LinkedIn.