Google Colab the free GPU/TPU Jupyter Notebook Service
What is Google Colab
Google Colaboratory or „Colab“ for short is a free Jupyter notebook service from Google. It requires no setup and runs entirely in the cloud. In Google Colab you can write, execute, save and share your Jupiter Notebooks. You access powerful computing resources like TPUs and GPUs all for free through your browser. All major Python libraries like Tensorflow, Scikit-learn, PyTorch, Pandas, etc. are pre-installed. Google Colab requires no configuration, you only need a Google Account and then you are good to go. Your notebooks are stored in your Google Drive, or can be loaded from GitHub. Colab notebooks can be shared just as you would with Google Docs or Sheets. Simply click the Share button at the top right of any Colab notebook, or follow these Google Drive file sharing instructions.
For more informations you can look into the official FAQ from Google Research. You can find the FAQ under Colaboratory – Google or you can have a look at the introduction video Get started with Google Colaboratory (Coding TensorFlow) - YouTube
Is it free?
Yes, it is completely free of charge you only need a Google account, which probably all of you have. You can use the CPU-, GPU- & TPU-Runtime completely for free. Google also offer in some cases the opportunity to extend the runtime into one with 25GB of memory completely for free.
Recently Google Introduced „Colab Pro“ which is a paid version for $9.99/month. With „Colab Pro“ you have prior access to GPU and TPUs and also higher memory. You can be up to 24 hours connected to your notebooks in comparison in the free version the connection limit is 12h per day. For more information read here: Google Colab Pro.
Ressources and Runtimes
| Type | Size |
|---|---|
| CPU | 2x |
| Memory | 12.52GB |
| GPU | T4 with 7,98GB or K80 with 11,97GB |
| TPUv2 | 8units |
| Disk | at least 25GB will increase as needed |
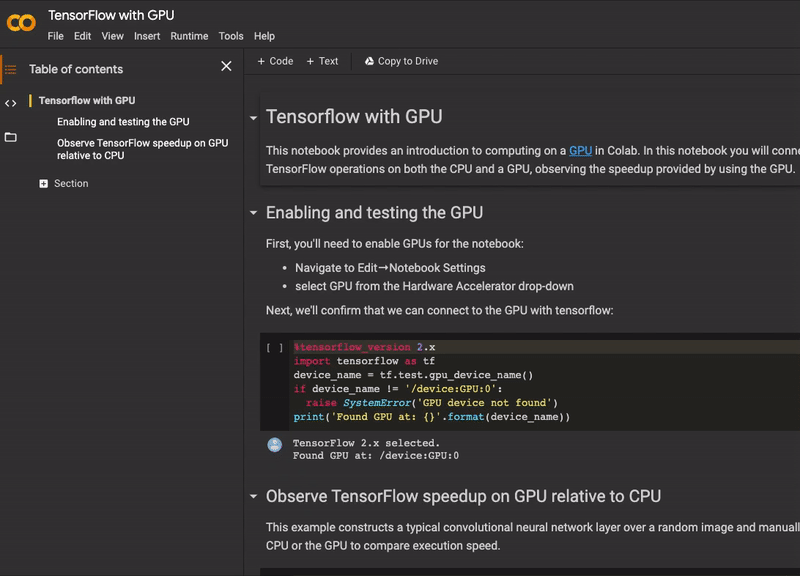
How to use accelerated hardware
Changing hardware runtime is as easy as it could get. You just have to navigate from „Runtime“ -> „change runtime type“ and select your preferred accelerated hardware type GPU or TPU.
How to get started
In the following section, I will describe and show some of the best features Google Colab has to offer. I created a Colab Notebook with all of the features for you to lookup.
Creating a Colab Notebook
You can create a Colab notebook directly in the Colab Environment or through your Google Drive.
Access your google drive storage in your Colab notebook by mounting it
If you want to mount your Google Drive to your notebook you simply have to execute the snippet below. After you executed it, you will see a URL where you have to login to your Google account and authorize Google Colab to access your Drive Storage. Afterward, you can copy the key from the link into the displayed input-field in the Colab notebook.
from google.colab import drive
drive.mount('/content/drive/')
You can show your files with !ls /content/drive or use the navigation on the left side.
Upload and Download local files to your Colab notebook
You can easily upload and download files from your local machine by executing files.upload(), which creates a HTML
file input-field and files.download().
Upload
from google.colab import files
uploaded = files.upload()
Dowlnload
from google.colab import files
files.download("File Name")
Download a complete folder by zipping it
from google.colab import files
import zipfile
import sys
foldername = "test_folder"
zipfile.ZipFile(f'{foldername}.zip', 'w', zipfile.ZIP_DEFLATED)
files.download(f'{foldername}.zip')
Change your directory permanently
You can change your directory permanently from /content to something you like by executing %cd path in a cell. This
is very useful if you clone your git repository into your colab notebook.
%cd pathShow an image in Colab
You can show pictures inline as you do it in jupyter with this simple snippet
from IPython.display import Image, display

display(Image('image.jpg'))
Advanced Pandas table
Google Colab offers an improved view of data frames in addition to the normal, familiar jupyter notebook view, in where you can filter columns directly without using python. You can even search for a range in date fields. You can use it by executing one line of code.
%load_ext google.colab.data_table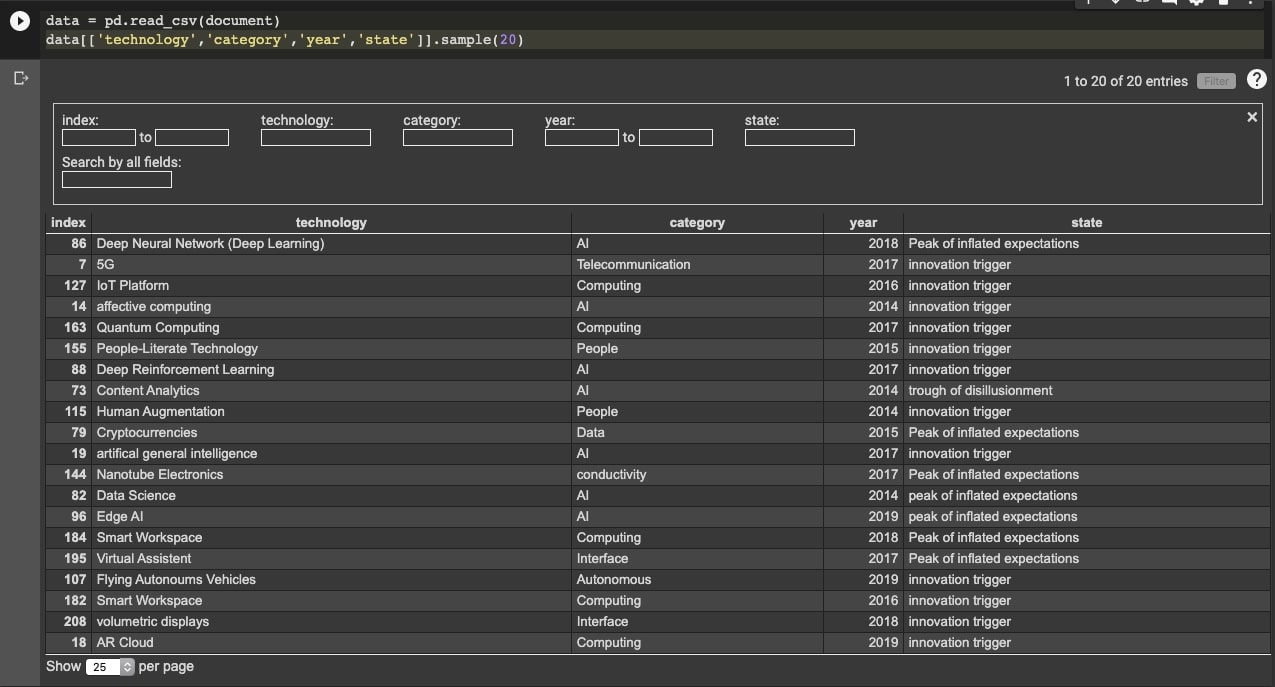
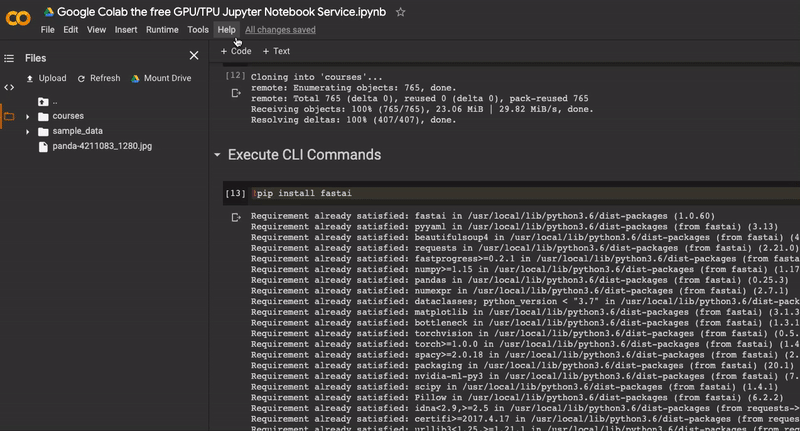
How to use git in Colab
Google Colab provides a lot of benefits, but one downside is you have to save your notebook to your google drive. Normally you use some kind of git tool. The easiest way to overcome this problem is either by copying your notebook from GitHub into your Colab Environment with this easy copy integration for notebooks or you can use CLI commands to load your private and public repository into your git. The only problem with using GitHub Repositories in your Colab is you cannot push back to your Repository, you have to save it manually („File“ -> „save a Copy as Github Gist“ or „Save a copy on Github“). If you want to integrate your repository directly you have to set up git in your Colab environment like you normally do on your local machine. Chella wrote an article in Towards Data Science on how to do it. From Git to Colab, via SSH - Towards Data Science
# git clone private repository
!git clone https://username:password@github.com/username/repository.git

# git clone public repository
!git clone https://github.com/fastai/courses.git
An extra tip is after you cloned your repository, you can permanently change directory to the repository by executing
%cd /content/your_repostiory_name. After that, every cell will be executed in the directory of your repository.
Execute CLI commands
You can execute CLI commands for example, to install python package, update python package or run bash scripts just by
putting ! before the command.
!pip install fastaiCustomize Shortcuts and changing Theme
You can customize Shortcuts by navigating from "Tools“ -> „Keyboard shortcuts…“ or if you want to change your theme you
must navigate from „Tools“ -> „Settings“ and under „Site“ you can change it.
Thanks for reading my first blog post about Google Colaboratory.
See you soon 😊