Setup Deep Learning environment for Hugging Face Transformers with Habana Gaudi on AWS
This blog contains instructions for how to setup a Deep Learning Environment for Habana Gaudi on AWS using the DL1 instance type and Hugging Face libraries like transformers, optimum, datasets. This guide will show you how to set up the development environment on the AWS cloud and get started with Hugging Face Libraries.
This guide covers:
- Requirements
- Create an AWS EC2 instance
- Connect to the instance via ssh
- Use Jupyter Notebook/Lab via ssh
- Fine-tune Hugging Face Transformers with Optimum
- Clean up
Or you can jump to the Conclusion.
Let's get started! 🚀
1. Requirements
Before we can start make sure you have met the following requirements
- AWS Account with quota for DL1 instance type
- AWS CLI installed
- AWS IAM user configured in CLI with permission to create and manage ec2 instances
2. Create an AWS EC2 instance
To be able to launch an EC2 instance we need to create a key-pair and security-group, which will be used to access the instance via ssh.
Configure AWS PROFILE and AWS REGION which will be used for the instance
export AWS_PROFILE=<your-aws-profile>
export AWS_DEFAULT_REGION=<your-aws-region>
We create a key pair using the aws cli and save the key into a local .pem file.
KEY_NAME=habana
aws ec2 create-key-pair --key-name ${KEY_NAME} --query 'KeyMaterial' --output text > ${KEY_NAME}.pem
chmod 400 ${KEY_NAME}.pem
Next we create a security group, which allows ssh access to the instance. We are going to use the default VPC, but this could be adjusted by changing the vpc-id in the create-security-group command.
SG_NAME=habana
DEFAULT_VPC_ID=$(aws ec2 describe-vpcs --query 'Vpcs[?isDefault==true].VpcId' --output text)
echo "Default VPC ID: ${DEFAULT_VPC_ID}"
SECURITY_GROUP_ID=$(aws ec2 create-security-group --group-name ${SG_NAME}-sg --description "SG for Habana Deep Learning" --vpc-id ${DEFAULT_VPC_ID} --output text)
echo "Security Group ID: ${SECURITY_GROUP_ID}"
echo $(aws ec2 authorize-security-group-ingress --group-id ${SECURITY_GROUP_ID} --protocol tcp --port 22 --cidr 0.0.0.0/0 --output text)
We completed all necessary steps to start our DL1 Habana Gaudi instance in a secure environment. We are going to use the community AMI created and managed by Habana, which is identical to the marketplace. The community AMI doesn't require an opt-in first. if you want to use the official marketplace image you have to subscribe on the UI first and then you can access it with the following command AMI_ID=$(aws ec2 describe-images --filters "Name=name,Values=* Habana Deep Learning Base AMI (Ubuntu 20.*" --query 'Images[0].ImageId' --output text).
AMI_ID=$(aws ec2 describe-images --filters "Name=name,Values=*habanalabs-base-ubuntu20.04*"  --query 'Images[0].ImageId' --output text)
echo "AMI ID: ${AMI_ID}"
INSTANCE_TYPE=dl1.24xlarge
INSTANCE_NAME=habana

aws ec2 run-instances \
  --image-id ${AMI_ID} \
  --key-name ${KEY_NAME} \
  --count 1 \
  --instance-type ${INSTANCE_TYPE} \
  --security-group-ids ${SECURITY_GROUP_ID} \
  --block-device-mappings 'DeviceName=/dev/sda1,Ebs={VolumeSize=150}' \
  --tag-specifications "ResourceType=instance,Tags=[{Key=Name,Value=${INSTANCE_NAME}-demo}]"
P.S. you can also use the start_instance.sh script from Github repository which does all of the steps above.
3. Connect to the instance via ssh
After around 45-60 seconds we can connect to the Habana Gaudi instance via ssh. We will use the following command to get the public IP and then ssh into the machine using the earlier created key pair.
INSTANCE_NAME=habana
PUBLIC_DOMAIN=$(aws ec2 describe-instances --profile sandbox \
--filters Name=tag-value,Values=${INSTANCE_NAME}-demo \
--query 'Reservations[*].Instances[*].PublicDnsName' \
--output text)
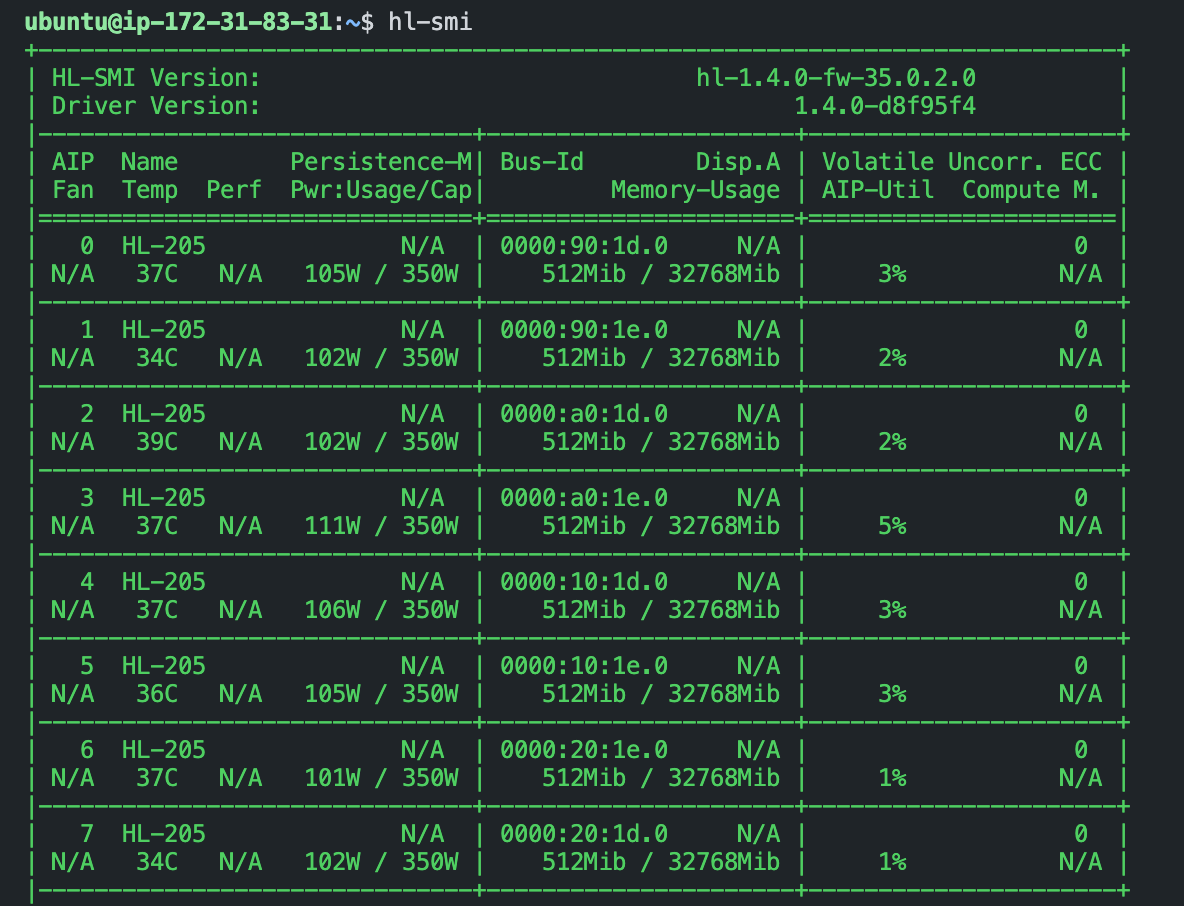
ssh -i ${KEY_NAME}.pem ubuntu@${PUBLIC_DOMAIN//[$'\t\r\n ']}Lets see if we can access the Gaudi devices. Habana provides a similar CLI tool like nvidia-smi with hl-smi command.
You can find more documentation here.
hl-smiYou should see a similar output to the one below.
We can also test if we can allocate the hpu device in PyTorch. Therefore we will pull the latest docker image with torch installed and run python3 with the code snippet below. A more detailed guide can be found in Porting a Simple PyTorch Model to Gaudi.
start docker container with torch installed
docker run -it --runtime=habana -e HABANA_VISIBLE_DEVICES=all -e OMPI_MCA_btl_vader_single_copy_mechanism=none --cap-add=sys_nice --net=host --ipc=host vault.habana.ai/gaudi-docker/1.5.0/ubuntu20.04/habanalabs/pytorch-installer-1.11.0:latestStart a python3 session with python3 and execute the code below
import torch_hpu
print(f"device available:{torch_hpu.is_available()}")
print(f"device_count:{torch_hpu.device_count()}")
4. Use Jupyter Notebook/Lab via ssh
Connecting via ssh works as expected, but who likes to develop inside a terminal? In this section we will learn how to install Jupyter and Jupyter Notebooks/Lab and how to connect to have a better machine learning environment thant just a terminal. But for this to work we need to add port for fowarding in the ssh connection to be able to open it in the browser.
As frist we need to create a new ssh connection with port fowarding to port an from 8888:
INSTANCE_NAME=habana
PUBLIC_DOMAIN=$(aws ec2 describe-instances --profile sandbox \
    --filters Name=tag-value,Values=${INSTANCE_NAME}-demo  \
    --query 'Reservations[*].Instances[*].PublicDnsName' \
    --output text)
ssh -L 8888:localhost:8888 -i ${KEY_NAME}.pem ubuntu@${PUBLIC_DOMAIN//[$'\t\r\n ']}
After we are connected we are again we are again starting our container with a mounted volume to not lose our data later.
docker run -it --runtime=habana -e HABANA_VISIBLE_DEVICES=all -e OMPI_MCA_btl_vader_single_copy_mechanism=none --cap-add=sys_nice --net=host --ipc=host -v /home/ubuntu:/home/ubuntu -w /home/ubuntu vault.habana.ai/gaudi-docker/1.5.0/ubuntu20.04/habanalabs/pytorch-installer-1.11.0:latestNext and last step is to install and run jupyter
pip install jupyter
jupyter notebook --allow-root
You should see a familiar jupyter output with a url to the notebook.
http://localhost:8888/?token=c7a150a559c3e9d6d48d285f7023a341aaf94dac994d787dWe can click on it and a jupyter environment opens in our local browser.

We can now run similar tests as via the terminal. Therefore create a new notebook and run the following code:
import torch_hpu
print(f"device available:{torch_hpu.is_available()}")
print(f"device_count:{torch_hpu.device_count()}")
5. Fine-tune Hugging Face Transformers with Optimum
Our development environments are set up. Now let's install and test the Hugging Face Transformers on habana. To do this we simply install the transformers and optimum[habana] packages via pip.
pip install transformers datasets
pip install git+https://github.com/huggingface/optimum-habana.git # workaround until release of optimum-habana
After we have installed the packages we can start fine-tuning a transformers model with the optimum package. Below you can find a simplified example fine-tuning bert-base-uncased model on the emotion dataset for text-classification task. This is a very simplified example, which only uses 1 Gaudi Processor instead of 8 and the TrainingArguments are not optimized.
from transformers import AutoModelForSequenceClassification, AutoTokenizer
from datasets import load_dataset
from optimum.habana import GaudiTrainer, GaudiTrainingArguments

# load pre-trained model and tokenizer
model = AutoModelForSequenceClassification.from_pretrained("bert-base-uncased", num_labels=6)
tokenizer = AutoTokenizer.from_pretrained("bert-base-uncased")

# load dataset
dataset = load_dataset("emotion")

# preprocess dataset
def tokenize_function(examples):
    return tokenizer(examples["text"], padding="max_length", truncation=True)

tokenized_datasets = dataset.map(tokenize_function, batched=True)

# define Gaudi Training Arguments
training_args = GaudiTrainingArguments(
  output_dir=".",
  use_habana=True,
  use_lazy_mode=True,
  gaudi_config_name="Habana/bert-base-uncased",
  per_device_train_batch_size=48
)

# Initialize our Trainer
trainer = GaudiTrainer(
    model=model,
    args=training_args,
    train_dataset=tokenized_datasets["train"],
    tokenizer=tokenizer,
)

# Run training
trainer.train()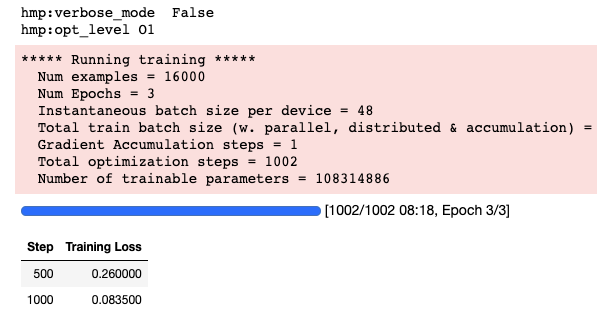
We will create a more detailed guide on how to leverage the habana instances in the near future.
6. Clean up
To make sure we stop/delete everything we created you can follow the steps below.
- Terminate the ec2 instance
INSTANCE_NAME=habana
aws ec2 terminate-instances --instance-ids $(aws ec2 describe-instances --filters "Name=tag:Name,Values=${INSTANCE_NAME}-demo" --query 'Reservations[*].Instances[*].InstanceId' --output text) \
2>&1 > /dev/null- Delete security group. can be delete once the instance is terminated
SG_NAME=habana
aws ec2 delete-security-group --group-name ${SG_NAME}-sg- Delete key pair can be delete once the instance is terminated
KEY_NAME=habana
aws ec2 delete-key-pair --key-name ${KEY_NAME}
rm ${KEY_NAME}.pem
7. Conclusion
That's it now you can start using Habana for running your Deep Learning Workload with Hugging Face Transformers. We walked through how to set up a development enviroment for Habana Gaudi via the terminal or with a jupyter environment. In addition to this, you can use vscode via Remote Development using SSH to connect to your instance and run your code.
The next step is to create an advanced guide for Hugging Face Transformers with Habana Gaudi to learn on how to use distributed training, configure optimized TrainingArguments and fine-tune & pre-train transformer models. Stay tuned!🚀
Until then you can check-out more examples in the optimum-habana respository.
Thanks for reading! If you have any questions, feel free to contact me, through Github, or on the forum. You can also connect with me on Twitter or LinkedIn.