Train and Deploy Mistral 7B with Hugging Face on Amazon SageMaker
In this sagemaker example, we are going to learn how to fine-tune open LLMs, like Llama 2, Falcon or Mistral using QLoRA and how to deploy them afterwards using the Hugging Face LLM Inference DLC
In our example, we are going to leverage Hugging Face Transformers, Accelerate, and PEFT. We will also make use of new and efficient features and methods including, Flash Attention, Datset Packing and Mixed Precision Training.
In Detail you will learn how to:
- Setup Development Environment
- Load and prepare the dataset
- Fine-Tune Mistral 7B with QLoRA on Amazon SageMaker
- Deploy Fine-tuned Mistral 7B on Amazon SageMaker
- Stream Inference Requests from the Deployed Model
1. Setup Development Environment
!pip install "transformers==4.34.0" "datasets[s3]==2.13.0" "sagemaker>=2.190.0" "gradio==3.50.2" --upgrade --quietIf you are going to use Llama 2 you need to login into our hugging face account, to use your token for accessing the gated repository. We can do this by running the following command:
!huggingface-cli login --token YOUR_TOKENIf you are going to use Sagemaker in a local environment. You need access to an IAM Role with the required permissions for Sagemaker. You can find here more about it.
import sagemaker
import boto3
sess = sagemaker.Session()
# sagemaker session bucket -> used for uploading data, models and logs
# sagemaker will automatically create this bucket if it not exists
sagemaker_session_bucket=None
if sagemaker_session_bucket is None and sess is not None:
    # set to default bucket if a bucket name is not given
    sagemaker_session_bucket = sess.default_bucket()

try:
    role = sagemaker.get_execution_role()
except ValueError:
    iam = boto3.client('iam')
    role = iam.get_role(RoleName='sagemaker_execution_role')['Role']['Arn']

sess = sagemaker.Session(default_bucket=sagemaker_session_bucket)

print(f"sagemaker role arn: {role}")
print(f"sagemaker bucket: {sess.default_bucket()}")
print(f"sagemaker session region: {sess.boto_region_name}")
2. Load and prepare the dataset
We will use Dolly an open source dataset of instruction-following records on categories outlined in the InstructGPT paper, including brainstorming, classification, closed QA, generation, information extraction, open QA, and summarization.
{
  "instruction": "What is world of warcraft",
  "context": "",
  "response": "World of warcraft is a massive online multi player role playing game. It was released in 2004 by bizarre entertainment"
}
To load the dolly dataset, we use the load_dataset() method from the 🤗 Datasets library.
from datasets import load_dataset
from random import randrange

# Load dataset from the hub
dataset = load_dataset("databricks/databricks-dolly-15k", split="train")

print(f"dataset size: {len(dataset)}")
print(dataset[randrange(len(dataset))])
# dataset size: 15011
To instruct tune our model we need to convert our structured examples into a collection of tasks described via instructions. We define a formatting_function that takes a sample and returns a string with our format instruction.
def format_dolly(sample):
    instruction = f"### Instruction\n{sample['instruction']}"
    context = f"### Context\n{sample['context']}" if len(sample["context"]) > 0 else None
    response = f"### Answer\n{sample['response']}"
    # join all the parts together
    prompt = "\n\n".join([i for i in [instruction, context, response] if i is not None])
    return prompt
lets test our formatting function on a random example.
from random import randrange

print(format_dolly(dataset[randrange(len(dataset))]))
In addition, to formatting our samples we also want to pack multiple samples to one sequence to have a more efficient training. This means that we are stacking multiple samples to one sequence and split them with an EOS Token. This makes the training more efficient. Packing/stacking samples can be done during training or before. We will do it before training to save time. We created a utility method pack_dataset that takes a dataset and a packing function and returns a packed dataset.
from transformers import AutoTokenizer

model_id = "mistralai/Mistral-7B-v0.1"
tokenizer = AutoTokenizer.from_pretrained(model_id, use_auth_token=True)
To pack/stack our dataset we need to first tokenize it and then we can pack it with the pack_dataset method. To prepare our dataset we will now:
- Format our samples using the template method and add an EOS token at the end of each sample
- Tokenize our dataset to convert it from text to tokens
- Pack our dataset to 2048 tokens
from random import randint
# add utils method to path for loading dataset
import sys
sys.path.append("../scripts/utils")
from pack_dataset import pack_dataset


# template dataset to add prompt to each sample
def template_dataset(sample):
    sample["text"] = f"{format_dolly(sample)}{tokenizer.eos_token}"
    return sample

# apply prompt template per sample
dataset = dataset.map(template_dataset, remove_columns=list(dataset.features))
# print random sample
print(dataset[randint(0, len(dataset))]["text"])

# tokenize dataset
dataset = dataset.map(
    lambda sample: tokenizer(sample["text"]), batched=True, remove_columns=list(dataset.features)
)

# chunk dataset
lm_dataset = pack_dataset(dataset, chunk_length=2048) # We use 2048 as the maximum length for packing

# Print total number of samples
print(f"Total number of samples: {len(lm_dataset)}")
After we processed the datasets we are going to use the new FileSystem integration to upload our dataset to S3. We are using the sess.default_bucket(), adjust this if you want to store the dataset in a different S3 bucket. We will use the S3 path later in our training script.
# save train_dataset to s3
training_input_path = f's3://{sess.default_bucket()}/processed/mistral/dolly/train'
lm_dataset.save_to_disk(training_input_path)

print("uploaded data to:")
print(f"training dataset to: {training_input_path}")
3. Fine-Tune Mistral 7B with QLoRA on Amazon SageMaker
We are going to use the recently introduced method in the paper "QLoRA: Quantization-aware Low-Rank Adapter Tuning for Language Generation" by Tim Dettmers et al. QLoRA is a new technique to reduce the memory footprint of large language models during finetuning, without sacrificing performance. The TL;DR; of how QLoRA works is:
- Quantize the pretrained model to 4 bits and freezing it.
- Attach small, trainable adapter layers. (LoRA)
- Finetune only the adapter layers, while using the frozen quantized model for context.
We prepared a run_qlora.py, which implements QLora using PEFT to train our model. The script also merges the LoRA weights into the model weights after training. That way you can use the model as a normal model without any additional code. The model will be temporally offloaded to disk, if it is too large to fit into memory.
In Addition to QLoRA we will leverage the new Flash Attention 2 integrationg with Transformers to speed up the training. Flash Attention 2 is a new efficient attention mechanism that is up to 3x faster than the standard attention mechanism.
from huggingface_hub import HfFolder


# hyperparameters, which are passed into the training job
hyperparameters ={
  'model_id': model_id,                             # pre-trained model
  'dataset_path': '/opt/ml/input/data/training',    # path where sagemaker will save training dataset
  'num_train_epochs': 3,                            # number of training epochs
  'per_device_train_batch_size': 6,                 # batch size for training
  'gradient_accumulation_steps': 2,                 # Number of updates steps to accumulate
  'gradient_checkpointing': True,                   # save memory but slower backward pass
  'bf16': True,                                     # use bfloat16 precision
  'tf32': True,                                     # use tf32 precision
  'learning_rate': 2e-4,                            # learning rate
  'max_grad_norm': 0.3,                             # Maximum norm (for gradient clipping)
  'warmup_ratio': 0.03,                             # warmup ratio
  "lr_scheduler_type":"constant",                   # learning rate scheduler
  'save_strategy': "epoch",                         # save strategy for checkpoints
  "logging_steps": 10,                              # log every x steps
  'merge_adapters': True,                           # wether to merge LoRA into the model (needs more memory)
  'use_flash_attn': True,                           # Whether to use Flash Attention
  'output_dir': '/tmp/run',                         # output directory, where to save assets during training
                                                    # could be used for checkpointing. The final trained
                                                    # model will always be saved to s3 at the end of training
}

if HfFolder.get_token() is not None:
    hyperparameters['hf_token'] = HfFolder.get_token() # huggingface token to access gated models, e.g. llama 2
In order to create a sagemaker training job we need an HuggingFace Estimator. The Estimator handles end-to-end Amazon SageMaker training and deployment tasks. The Estimator manages the infrastructure use. Amazon SagMaker takes care of starting and managing all the required ec2 instances for us, provides the correct huggingface container, uploads the provided scripts and downloads the data from our S3 bucket into the container at /opt/ml/input/data. Then, it starts the training job by running.
Note: Make sure that you include the
requirements.txtin thesource_dirif you are using a custom training script. We recommend to just clone the whole repository.
from sagemaker.huggingface import HuggingFace

# define Training Job Name
job_name = f'huggingface-qlora-{hyperparameters["model_id"].replace("/","-").replace(".","-")}'

# create the Estimator
huggingface_estimator = HuggingFace(
    entry_point          = 'run_qlora.py',    # train script
    source_dir           = '../scripts',      # directory which includes all the files needed for training
    instance_type        = 'ml.g5.4xlarge',   # instances type used for the training job
    instance_count       = 1,                 # the number of instances used for training
    max_run              = 2*24*60*60,        # maximum runtime in seconds (days * hours * minutes * seconds)
    base_job_name        = job_name,          # the name of the training job
    role                 = role,              # Iam role used in training job to access AWS ressources, e.g. S3
    volume_size          = 300,               # the size of the EBS volume in GB
    transformers_version = '4.28',            # the transformers version used in the training job
    pytorch_version      = '2.0',             # the pytorch_version version used in the training job
    py_version           = 'py310',           # the python version used in the training job
    hyperparameters      =  hyperparameters,  # the hyperparameters passed to the training job
    environment          = { "HUGGINGFACE_HUB_CACHE": "/tmp/.cache" }, # set env variable to cache models in /tmp
    disable_output_compression = True         # not compress output to save training time and cost
)
You can also use
g5.2xlargeinstead of theg5.4xlargeinstance type, but then it is not possible to usemerge_weightsparameter, since to merge the LoRA weights into the model weights, the model needs to fit into memory. But you could save the adapter weights and merge them using merge_adapter_weights.py after training.
We can now start our training job, with the .fit() method passing our S3 path to the training script.
# define a data input dictonary with our uploaded s3 uris
data = {'training': training_input_path}

# starting the train job with our uploaded datasets as input
huggingface_estimator.fit(data, wait=True)
In our example for Mistral 7B, the SageMaker training job took 13968 seconds, which is about 3.9 hours. The ml.g5.4xlarge instance we used costs $2.03 per hour for on-demand usage. As a result, the total cost for training our fine-tuned Mistral model was only ~$8.
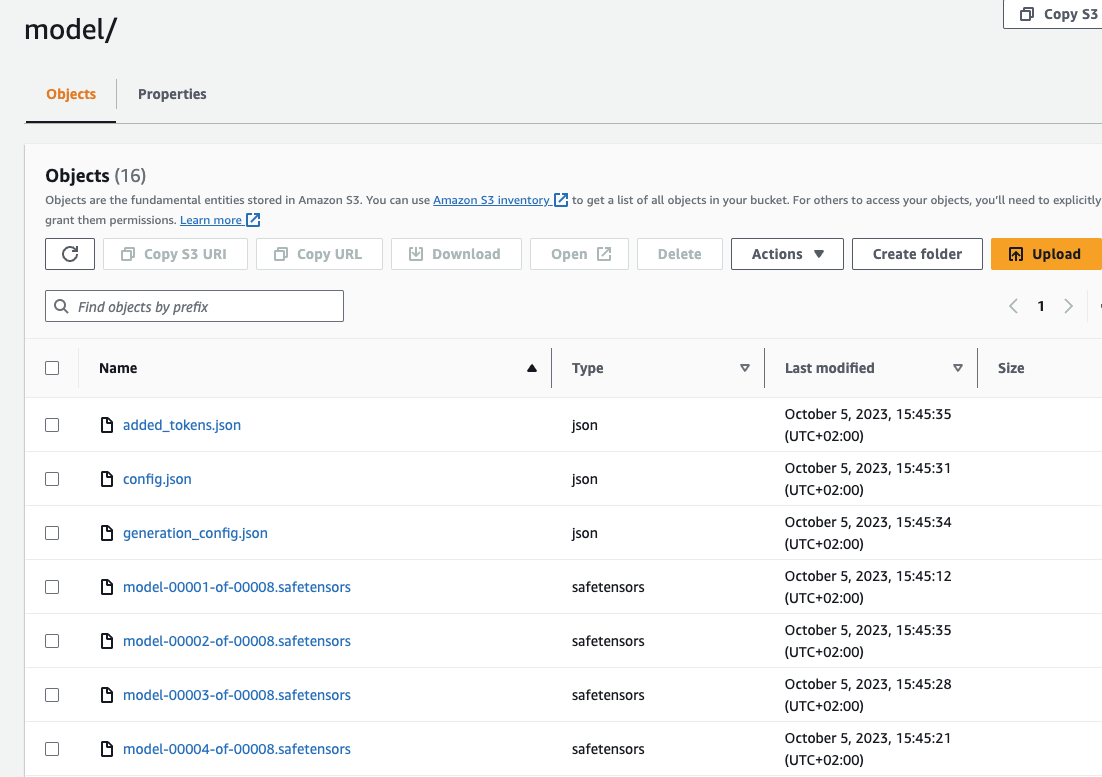
Now lets make sure SageMaker has successfully uploaded the model to S3. We can use the model_data property of the estimator to get the S3 path to the model. Since we used merge_weights=True and disable_output_compression=True the model is stored as raw files in the S3 bucket.
huggingface_estimator.model_data["S3DataSource"]["S3Uri"].replace("s3://", "https://s3.console.aws.amazon.com/s3/buckets/")You should see a similar folder structure and files in your S3 bucket:
Now, lets deploy our model to an endpoint. 🚀
4. Deploy Fine-tuned Mistral 7B on Amazon SageMaker
We are going to use the Hugging Face LLM Inference DLC a purpose-built Inference Container to easily deploy LLMs in a secure and managed environment. The DLC is powered by Text Generation Inference (TGI) solution for deploying and serving Large Language Models (LLMs).
Compared to deploying regular Hugging Face models we first need to retrieve the container uri and provide it to our HuggingFaceModel model class with a image_uri pointing to the image. To retrieve the new Hugging Face LLM DLC in Amazon SageMaker, we can use the get_huggingface_llm_image_uri method provided by the sagemaker SDK. This method allows us to retrieve the URI for the desired Hugging Face LLM DLC based on the specified backend, session, region, and version. You can find the available versions here
from sagemaker.huggingface import get_huggingface_llm_image_uri

# retrieve the llm image uri
llm_image = get_huggingface_llm_image_uri(
  "huggingface",
  version="1.1.0",
  session=sess,
)

# print ecr image uri
print(f"llm image uri: {llm_image}")
We can now create a HuggingFaceModel using the container uri and the S3 path to our model. We also need to set our TGI configuration including the number of GPUs, max input tokens. You can find a full list of configuration options here.
import json
from sagemaker.huggingface import HuggingFaceModel

# s3 path where the model will be uploaded
# if you try to deploy the model to a different time add the s3 path here
model_s3_path = huggingface_estimator.model_data["S3DataSource"]["S3Uri"]

# sagemaker config
instance_type = "ml.g5.2xlarge"
number_of_gpu = 1
health_check_timeout = 300

# Define Model and Endpoint configuration parameter
config = {
  'HF_MODEL_ID': "/opt/ml/model", # path to where sagemaker stores the model
  'SM_NUM_GPUS': json.dumps(number_of_gpu), # Number of GPU used per replica
  'MAX_INPUT_LENGTH': json.dumps(1024), # Max length of input text
  'MAX_TOTAL_TOKENS': json.dumps(2048), # Max length of the generation (including input text)
}

# create HuggingFaceModel with the image uri
llm_model = HuggingFaceModel(
  role=role,
  image_uri=llm_image,
  model_data={'S3DataSource':{'S3Uri': model_s3_path,'S3DataType': 'S3Prefix','CompressionType': 'None'}},
  env=config
)
After we have created the HuggingFaceModel we can deploy it to Amazon SageMaker using the deploy method.
# Deploy model to an endpoint
# https://sagemaker.readthedocs.io/en/stable/api/inference/model.html#sagemaker.model.Model.deploy
llm = llm_model.deploy(
  initial_instance_count=1,
  instance_type=instance_type,
  container_startup_health_check_timeout=health_check_timeout, # 10 minutes to be able to load the model
)
SageMaker will now create our endpoint and deploy the model to it. This can takes a 10-15 minutes.
5. Stream Inference Requests from the Deployed Model
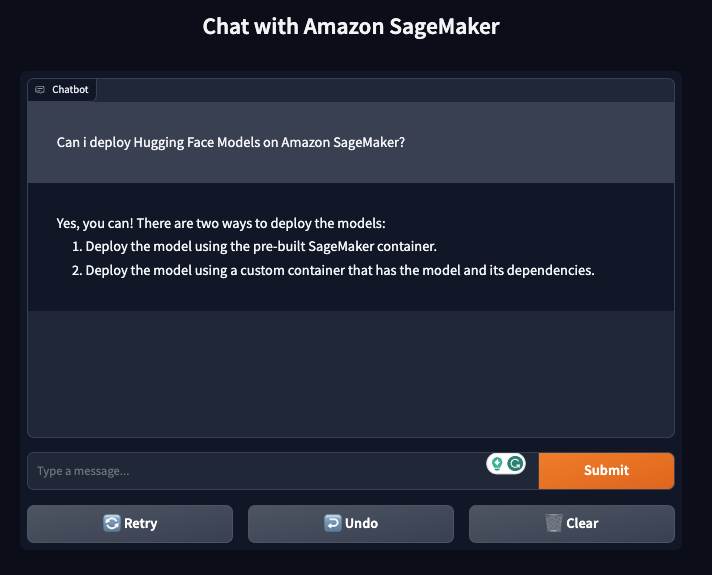
Amazon SageMaker supports streaming responses from your model. We can use this to stream responses, we can leverage this to create a streaming gradio application with a better user experience.
We created a sample application that you can use to test your model. You can find the code in gradio-app.py. The application will stream the responses from the model and display them in the UI. You can also use the application to test your model with your own inputs.
# add apps directory to path ../apps/
import sys
sys.path.append("../demo")
from sagemaker_chat import create_gradio_app

# hyperparameters for llm
parameters = {
    "do_sample": True,
    "top_p": 0.9,
    "temperature": 0.8,
    "max_new_tokens": 512,
    "repetition_penalty": 1.03,
    "stop": ["###", "</s>"],
}

# define format function for our input
def format_prompt(message, history, system_prompt):
    prompt = ""
    for user_prompt, bot_response in history:
        prompt += f"### Instruction\n{user_prompt}\n\n"
        prompt += f"### Answer\n{bot_response}\n\n"  # Response already contains "Falcon: "
    prompt += f"### Instruction\n{message}\n\n### Answer\n"
    return prompt

# create gradio app
create_gradio_app(
    llm.endpoint_name,           # Sagemaker endpoint name
    session=sess.boto_session,   # boto3 session used to send request
    parameters=parameters,       # Request parameters
    system_prompt=None,          # System prompt to use -> Mistral does not support system prompts
    format_prompt=format_prompt, # Function to format prompt
    concurrency_count=4,         # Number of concurrent requests
    share=True,                  # Share app publicly
)
Don't forget to delete the endpoint after you are done with the example.
llm.delete_model()
llm.delete_endpoint()
Thanks for reading! If you have any questions, feel free to contact me on Twitter or LinkedIn.