RLHF in 2024 with DPO & Hugging Face
This blog post walks you through how to use DPO to improve open LLMs using Hugging Face TRL, Transformers & datasets in 2024.
Research and experiments suggest that DPO should only be applied after SFT. This means we need an already fine-tuned LLM, which can be aligned with DPO. In this example we will use cognitivecomputations/dolphin-2.1-mistral-7b a fine-tuned Mistral 7B with ChatML template.
- Setup development environment
- Create and prepare the preference dataset
- Align LLM with TRL and the DPOTrainer
- Test LLM (vibe-check)
- Evaluate open LLMs on MT-Bench
Note: This example is designed to be an introduction to DPO and TRL. It is build for a single GPU environment to guide you through the process. For production use, you should consider using a distributed environment. It should be possible to run the example on a single GPU with at least 24GB of memory by reducing the training arguments, with batch size, max seq length and run evaluation after the training.
1. Setup development environment
Our first step is to install Hugging Face Libraries and Pytorch, including trl, transformers and datasets. If you haven't heard of trl yet, don't worry. It is a new library on top of transformers and datasets, which makes it easier to fine-tune, rlhf, align open LLMs.
# Install Pytorch & other libraries
!pip install "torch==2.1.2" tensorboard pillow

# Install Hugging Face libraries
!pip install  --upgrade \
  "transformers[sentencepiece]==4.37.2" \
  "datasets==2.16.1" \
  "accelerate==0.26.1" \
  "evaluate==0.4.1" \
  "bitsandbytes==0.42.0" \
  "trl==0.7.11" \
  "peft==0.8.2"
If you are using a GPU with Ampere architecture (e.g. NVIDIA A10G or RTX 4090/3090) or newer, you can use Flash Attention. FlashAttention can accelerate training time up to 3x.
*Note: If your machine has less than 96GB of RAM and lots of CPU cores, reduce the number of MAX_JOBS.
import torch; assert torch.cuda.get_device_capability()[0] >= 8, 'Hardware not supported for Flash Attention'
# install flash-attn
!pip install ninja packaging
!MAX_JOBS=4 pip install flash-attn --no-build-isolation
Installing flash attention can take quite a bit of time (10-45 minutes).
We will use the Hugging Face Hub as a remote model storage and automatically push our model, logs and information to the Hub during training. You must register on the Hugging Face for this. After you have an account, we will use the login util from the huggingface_hub package to log into our account and store our token (access key) on the disk.
from huggingface_hub import login

login(
  token="", # ADD YOUR TOKEN HERE
  add_to_git_credential=True
)
2. Create and prepare the dataset
Improving the helpfulness or quality of LLMs through Aligning methods like DPO doesn’t come for free. Compared to traditional supervised fine-tuning (SFT) alignment methods require preference data. Preference data is crucial as it serves as a proxy against which the model's outputs are evaluated and aligned. A typical DPO dataset includes a triplet out of prompt, chosen, and rejected response. There are several ways to create such a dataset, including:
- Using existing open-source datasets, e.g., SHP
- Using LLMs to create synthetic preferences, e.g., Ultrafeedback
- Using Humans to create datasets, e.g., HH
- Using a combination of the above methods, e.g., Orca DPO
Each method has advantages and disadvantages and depends on the budget, time, and quality requirements.
It's important to recognize that preference datasets can inherently reflect the biases of the human/AI they are based on. To ensure broader applicability and fairness, it's crucial to incorporate a diverse range of feedback in creating these datasets.
In our example, we will use the argilla/ultrafeedback-binarized-preferences-cleaned dataset. The best DPO dataset represents the real-world preferences of your users or customers. If you don’t have collected preferences yet, start with your existing SFT data and use different sizes/quality LLMs to generate feedback. This method was used to create the Orca DPO dataset, where GPT-4 was used for the accepted responses and Llama 70B Chat for the rejected responses. A DPO dataset will have the following format
{"chosen": "<prompt + good response>", "rejected": "<prompt + worse response>" }
{"chosen": "<prompt + good response>", "rejected": "<prompt + worse response>" }
{"chosen": "<prompt + good response>", "rejected": "<prompt + worse response>" }
The <pompt + good response> and <prompt + worse response> are representend in the conversational format as:
[
  { "role": "system", "content": "You are..." },
  { "role": "user", "content": "..." },
  { "role": "assistant", "content": "..." }
]
Note: If the dataset includes multiple turns you need to make sure that only the last turn between chosen and rejected is different. If not, you must reduce the conversation until only the last assistant turn is different.
The DPOTrainer expects the inputs as triples of (prompt, chosen, rejected), where chosen and rejected are the final turn of a dialogue and the prompt is N-1 turns. Those inputs also need to be already formated with the tempalte of the model, e.g. <|im_start|>user\nINSTRUCTION\n<|im_end|>\n<|im_start|>assistant\n....
In our example we are going to load our open-source dataset using the 🤗 Datasets library and then convert it into the correct format. The argilla/ultrafeedback-binarized-preferences-cleaned already comes with the DPO format (chosen/rejected). This means we can create our triplet and templetite it usng a tokenizer and the apply_chat_template methoh. We are randomly downsampling the dataset to 11,000 training samples and 2,750 test samples
Note: This step can be different for your use case. For example, if you might need to create the conversational format and concate the prompt and chosen/rejected response, e.g. Human:\n ... Assistant:\n.
from transformers import AutoTokenizer
from datasets import load_dataset

# Load Tokenizer from the hub
model_id = "cognitivecomputations/dolphin-2.1-mistral-7b" # replace with your model id
tokenizer = AutoTokenizer.from_pretrained(model_id)

# Load dataset from the hub
dataset = load_dataset("argilla/ultrafeedback-binarized-preferences-cleaned", split="train")
dataset = dataset.shuffle().select(range(13750))


def rec_extract_assistant_messages(messages, index=-1):
  """Recursively extract the last assistant messages from the end of the conversation."""
  if messages[index]["role"] == "assistant":
    return [messages[index]]
  else:
    return rec_extract_assistant_messages(messages, index-1)

# System message used if there is no system message at the beginning of the conversation
# Can be repelaced and modified as needed
DEFAULT_SYSTEM_MESSAGE = "You are Dolphin, a helpful AI assistant."

def create_triplets(example, tokenizer, default_system_message=DEFAULT_SYSTEM_MESSAGE):
  """Create the triplets (prompt, chosen, rejected)"""
  # Extract the N-1 turns to form the prompt
  # Prepend a system message if the first message is not a system message
  prompt_messages = example["chosen"][:-1]
  if example["chosen"][0]["role"] != "system":
      prompt_messages.insert(0, {"role": "system", "content": default_system_message})
  # Now we extract the final assistant turn to define chosen/rejected responses
  chosen_messages = rec_extract_assistant_messages(example["chosen"])
  rejected_messages = rec_extract_assistant_messages(example["rejected"])

  # apply template to the messages and return the triplets
  return {
    "prompt": tokenizer.apply_chat_template(prompt_messages, tokenize=False),
    "chosen": tokenizer.apply_chat_template(chosen_messages, tokenize=False),
    "rejected": tokenizer.apply_chat_template(rejected_messages, tokenize=False)
  }

dataset = dataset.map(create_triplets, remove_columns=dataset.features, fn_kwargs={"tokenizer": tokenizer})
# split dataset into 11,000 training samples and 2,750 test samples
dataset = dataset.train_test_split(test_size=2750/13750)

# print sample cut of
print(dataset["train"][0]["prompt"][:50])
print(dataset["train"][0]["chosen"][:50])
print(dataset["train"][0]["rejected"][:50])

# save datasets to disk
dataset["train"].to_json("train_dataset.json", orient="records")
dataset["test"].to_json("test_dataset.json", orient="records")
3. Align LLM with TRL and the DPOTrainer
TRL supports the DPO through a dedicated DPOTrainer for alinging LLMs from preference data, as described in Direct Preference Optimization: Your Language Model is Secretly a Reward Model. The DPOTrainer is a subclass of the Trainer from the transformers library and supports all the same features, including logging, evaluation, and checkpointing.
One big difference to SFT is that for DPO we need an additional Reference Model, which is used for KL-Divergence to help stabilize the training. The Reference Model is normally the same model as the one we are training, but frozen. This means for DPO you need additional memory and compute resources. To keep our example efficient we will use PEFT and adatpers. We load your fine-tuned and then add a new trainable adapters. This means that we will only tune adapters and not the whole model using DPO. The origian model will be then used as reference model itself. If you want to train all parameter with DPO you need to provide a model and `reference_model, but this requires more memory and compute resources.
Lets start by loading our saved datasets from disk.
from datasets import load_dataset

# Load jsonl data from disk
train_dataset = load_dataset("json", data_files="train_dataset.json", split="train")
eval_dataset = load_dataset("json", data_files="test_dataset.json", split="train")
We are going to train cognitivecomputations/dolphin-2.1-mistral-7b. Dolphin is a fine-tuned Mistral 7B with ChatML template support system messages. You can easily swap out the model for another model, e.g. Mistral or Mixtral models, TII Falcon, or any other LLMs by changing our model_id variable.
Note: Be aware the bigger the model the more memory it will require. In our example we will use the 7B version, which can be tuned on 24GB GPUs. If you have a smaller GPU.
The first step is to load the model in int-4 using bitsandbytes and then add
import torch
from transformers import AutoTokenizer, AutoModelForCausalLM, BitsAndBytesConfig

# Hugging Face model id
model_id = "cognitivecomputations/dolphin-2.1-mistral-7b" # replace with your model id

# BitsAndBytesConfig int-4 config
bnb_config = BitsAndBytesConfig(
    load_in_4bit=True, bnb_4bit_use_double_quant=True, bnb_4bit_quant_type="nf4", bnb_4bit_compute_dtype=torch.bfloat16
)

# Load model and tokenizer
model = AutoModelForCausalLM.from_pretrained(
    model_id,
    device_map="auto",
    use_cache=False,
    attn_implementation="flash_attention_2",
    torch_dtype=torch.bfloat16,
    quantization_config=bnb_config
)
tokenizer = AutoTokenizer.from_pretrained(model_id)
tokenizer.pad_token = tokenizer.eos_token
tokenizer.padding_side = 'left' # to prevent errors with FA
tokenizer.truncation_side = 'left' # to prevent cutting off last generation
Compared to the SFTTrainer the DPOTrainer has two parameter related to dataset sizing with max_prompt_length and max_length. The max_prompt_length is the maximum length of the prompt and the max_length is the maximum length of the prompt + chosen or rejected response. Those are used for tokenization, padding and trunctation. This means if we set those wrongly our data will be potentially cut off, but if we set them too high we will waste memory and time.
The Alignment Handbook when with the max_prompt_length of 512 and max_length of 1024 combining it with the truncation side left (90% of data samples where in that range). Truncation side left means the beginning will be removed so we keep the important assistant response. In our example we want to cover the ~97% percentile and filter out longer samples, rather than truncating.
#### COMMENT IN TO RECALCULATE MAX LENGTHS ####
# from numpy import percentile

# # lets find the p95 length of the prompt
# prompt_length = int(percentile([len(tokenizer(x)["input_ids"]) for x in train_dataset["prompt"]], 95))
# max_seq_length_chosen = int(percentile([len(tokenizer(x["prompt"] + x["chosen"])["input_ids"]) for x in train_dataset], 95))
# max_seq_length_rejected = int(percentile([len(tokenizer(x["prompt"] + x["rejected"])["input_ids"]) for x in train_dataset], 95))
# max_seq_length = max(max_seq_length_chosen, max_seq_length_rejected)

# # filter datasets to remove samples that are too long
# train_dataset = train_dataset.filter(lambda x: len(tokenizer(x["prompt"] + x["chosen"])["input_ids"]) <= max_seq_length)
# eval_dataset = eval_dataset.filter(lambda x: len(tokenizer(x["prompt"] + x["chosen"])["input_ids"]) <= max_seq_length)
# print(f"len(train_dataset): {len(train_dataset)}")
# print(f"len(eval_dataset): {len(eval_dataset)}")

# # Up the lengths to next multiple of 2, why 2? Don't know
# prompt_length = ((prompt_length + 1) // 2) * 2
# max_seq_length = ((max_seq_length + 1) // 2) * 2
# print(f"p95 prompt length: {prompt_length}")
# print(f"p95 prompt + chosen length: {max_seq_length}")

prompt_length = 1024
max_seq_length = 1512
Note: You could reduce the max_seq_length to 1512 this would lead to a memory reduction and then increase the batch_size.
The DPOTrainer supports a native integration with peft, which makes it super easy to efficiently align LLMs using, e.g. QLoRA. We only need to create our LoraConfig and provide it to the trainer. Our LoraConfig parameters are the same as for the SFT example.
from peft import LoraConfig

# LoRA config based on QLoRA paper & Sebastian Raschka experiment
peft_config = LoraConfig(
        lora_alpha=128,
        lora_dropout=0.05,
        r=256,
        bias="none",
        target_modules="all-linear",
        task_type="CAUSAL_LM",
)
Before we can start our training we need to define the hyperparameters (TrainingArguments) & DPO parameters.
Based on the Alignment Handbook we know that we need to use a ~10-100x smaller learning rate for DPO compared to SFT. In our example we reduce the learning rate from 2e-4 (SFT) to 5e-5 (DPO) or 40x smaller.
Another important parameter is the beta parameter, which is used to control the strength of the alignment. The bigger the beta is typically something in the range of 0.1 to 0.5. A higher beta means less divergence from the initial reference model or the text generations are very similar in terms of their probability distributions. In terms of training length, we go with 1 epoch, which is a good starting point. There is no rule of thumb for the number of epochs, it is also related to the number of epochs used for fine-tuning.
from transformers import TrainingArguments

args = TrainingArguments(
    output_dir="doplhin-dpo",               # directory to save and repository id
    num_train_epochs=1,                     # number of training epochs
    per_device_train_batch_size=12,         # batch size per device during training
    per_device_eval_batch_size=4,           # batch size for evaluation
    gradient_accumulation_steps=1,          # number of steps before performing a backward/update pass
    gradient_checkpointing=True,            # use gradient checkpointing to save memory
    optim="adamw_torch_fused",              # use fused adamw optimizer
    learning_rate=5e-5,                     # 10x higher LR than QLoRA paper
    max_grad_norm=0.3,                      # max gradient norm based on QLoRA paper
    warmup_ratio=0.1,                       # warmup ratio based on QLoRA paper
    lr_scheduler_type="cosine",             # use cosine learning rate scheduler
    logging_steps=25,                       # log every 25 steps
    save_steps=500,                         # when to save checkpoint
    save_total_limit=2,                     # limit the total amount of checkpoints
    evaluation_strategy="steps",            # evaluate every 1000 steps
    eval_steps=700,                         # when to evaluate
    bf16=True,                              # use bfloat16 precision
    tf32=True,                              # use tf32 precision
    push_to_hub=False,                      # push model to hub
    report_to="tensorboard",                # report metrics to tensorboard
)

dpo_args = {
    "beta": 0.1,                            # The beta factor in DPO loss. Higher beta means less divergence
    "loss_type": "sigmoid"                  # The loss type for DPO.
}
We now have every building block we need to create our DPOTrainer to start then training our model.
from trl import DPOTrainer

trainer = DPOTrainer(
    model,
    ref_model=None, # set to none since we use peft
    peft_config=peft_config,
    args=args,
    train_dataset=train_dataset,
    eval_dataset=eval_dataset,
    tokenizer=tokenizer,
    max_length=max_seq_length,
    max_prompt_length=prompt_length,
    beta=dpo_args["beta"],
    loss_type=dpo_args["loss_type"],
)
Start training our model by calling the train() method on our Trainer instance. This will start the training loop and train our model for 2 epochs. Since we are using a PEFT method, we will only save the adapted model weights and not the full model.
Note: During the training we want to minimize loss and grow reward/margins metrics. Keep an eye on the reward/margins metrics, if they are not growing you might need to increase the beta parameter or adjust the learning_rate.
# start training, the model will be automatically saved to the hub and the output directory
trainer.train()

# save model at the end of training
trainer.save_model()
The training with Flash Attention for 1 epochs with a dataset of ~10k samples took ~01:30:00 on 1x H100 GPU. You should be able to run the training on a g5.2xlarge instance by reducing the batch_size (est. to 1) and maybe the max_seq_length (est. to 1512).
# free the memory again
del model
del trainer
torch.cuda.empty_cache()
Optional: Merge LoRA adapter in to the original model
When using QLoRA, we only train adapters and not the full model. This means when saving the model during training we only save the adapter weights and not the full model. If you want to save the full model, which makes it easier to use with Text Generation Inference you can merge the adapter weights into the model weights using the merge_and_unload method and then save the model with the save_pretrained method. This will save a default model, which can be used for inference.
Note: You might require > 30GB CPU Memory.
#### COMMENT IN TO MERGE PEFT AND BASE MODEL ####
# from peft import PeftModel, PeftConfig
# from transformers import AutoModelForCausalLM, AutoTokenizer
# from peft import AutoPeftModelForCausalLM

# # Load PEFT model on CPU
# model = AutoPeftModelForCausalLM.from_pretrained(
#     args.output_dir,
#     torch_dtype=torch.float16,
#     low_cpu_mem_usage=True,
# )
# # Merge LoRA and base model and save
# merged_model = model.merge_and_unload()
# merged_model.save_pretrained(args.output_dir,safe_serialization=True, max_shard_size="2GB")
4. Test LLM (vibe-check)
After the training is done we want to test and evaluate or model. Evaluating Generative AI models in an open-ended way is not a trivial since 1 input can have multiple correct outputs. If you want to learn more about evaluating generative models, check out Evaluate LLMs and RAG a practical example using Langchain and Hugging Face blog post. Especially, when using RLHF techniques like DPO, it's important to "vibe-check" the model.
This means we want to manually check if the responses are more aligned with what our users or customers want. This could mean that we need to check if the responses are more helpful, more accurate, more engaging, or more informative as before. A good test here is if you have data from your SFT or previous LLMs, you can compare the outputs and see if the new model is better.
In our case we just check a few examples and see if the model generates helpful responses using unseen prompts.
import torch
from peft import AutoPeftModelForCausalLM
from transformers import AutoTokenizer, pipeline

# Path to saved peft adapter model
# peft_model_id = args.output_dir # or
peft_model_id = "./doplhin-dpo"

# Load Model with PEFT adapter
model = AutoPeftModelForCausalLM.from_pretrained(
  peft_model_id,
  device_map="auto",
  torch_dtype=torch.float16
)
tokenizer = AutoTokenizer.from_pretrained(peft_model_id)
# load into pipeline
pipe = pipeline("text-generation", model=model, tokenizer=tokenizer)
We randomely select prompts from the teknium/OpenHermes-2.5 dataset and a Hugging Face special.
prompts = [
  "A rectangular garden has a length of 25 feet and a width of 15 feet. If you want to build a fence around the entire garden, how many feet of fencing will you need?",
  "It's Bengay for muscle relief, a combination of methyl salicylate, menthol, and what other active ingredient commonly found in aspirin?",
  "How can i get rid of llamas in my backyard?"
]
Lets iterate over the prompts and generate a response using the generate method.
for prompt in prompts:
  messages = pipe.tokenizer.apply_chat_template([{"role":"user", "content": prompt}], tokenize=False)
  outputs = pipe(prompt, max_new_tokens=2048, do_sample=True, temperature=1.0, top_k=50, top_p=0.9, eos_token_id=tokenizer.eos_token_id, pad_token_id=tokenizer.pad_token_id)
  print(f"**Prompt**:\n{prompt}\n")
  print(f"**Generated Answer**:\n{outputs[0]['generated_text'][len(prompt):].strip()}")
  print("===" * 10)
5. Evaluate open LLMs on MT-Bench
For our use case we will use MT-Bench. MT-Bench is a Benchmark designed by LMSYS to test the conversation and instruction-following capabilities of large language models (LLMs). It evaluates LLMs through multi-turn conversations, focusing on their ability to engage in coherent, informative, and engaging exchanges. Since human evaluation is very expensive and time consuming, LMSYS uses GPT-4-Turbo to grade the model responses. Their paper shows as 80% agreement between strong LLM and human preferences. The LMSYS leaderboard is updated regularly (last updated February 2, 2024). MT-Bench is part of the FastChat Repository.
MT-Bench supports two different evaluation stratgies:
- single-answer grading: LLM grade and give a score to model's answer directly on a scale of 10
- pair-wise comparison: Compare two models and see which one is better using LLM as judge, resulting in a win-rate.
We are going to use the pair-wise comparison method to compare the base SFT Model with the DPO model, to see if aligning the model with DPO improved the model. Running pairwise comparison on MT-Bench includes the following steps:
- Clone the FastChat Repository & install the requirements
- Generate Responses using our SFT (original) & DPO (trained) model
- Evaluate the responses using pair-wise comparison and GPT-4-Turbo as Judge
- Plot and compare the results
MT-Bench currenlty only support OpenAI or Anthropic as Judge, where GPT-4 is the best. If you don't have access to GPT-4 you need to use a different evaluation method. I forked the FastChat repository and added GPT-4 Turbo reference answers to keep the cost lower.
Note: If you use this example to train different model, e.g. llama you need to make sure that your model is registered and support in FastChat. This means you need:
- a registered conversation template
- a moodel adapter used to match the model path
- register the model adapter
The easiest way to do this is to fork my repository and then add your model. In our example the base model of is cognitivecomputations/dolphin-2.1-mistral-7b, which is already registered in FastChat.
1. Clone the FastChat Repository & install the requirements
Let's start by cloning the FastChat repository and installing the requirements.
Note: Restart your notebook/kernel to clear up all GPU memory.
# Clone main branch of FastChat
!git clone https://github.com/philschmid/FastChat.git
# Install FastChat with model worker and llm_judge dependencies
!pip install -e "./FastChat[model_worker,llm_judge]"
!pip install matplotlib tabulate
2. Generate Responses using our SFT (original) & DPO (trained) model
To Generate the responses in MT-Bench we need our directory into FastChat/fastchat/llm_judge and then run the gen_model_answer.py script. This will generate the responses and save them into a file. We will use the default --max-new-token length of 1024, which could lead to some truncation. If you want to avoid truncation you can increase the --max-new-token length to 1512 or higher.
We change into the FastChat/fastchat/llm_judge directory to run all the evaluation scripts.
import os
%cd {os.getcwd()}/FastChat/fastchat/llm_judge
# should be in FastChat
Lets start with the SFT model and then the DPO model.
Note: The answer of the models will be stored to FastChat/fastchat/llm_judge/data/mt_bench/model_answer. You might want to save them later for additional evaluation, when you have a new fine-tuned model.
# make sure that is the correct path
model_path="cognitivecomputations/dolphin-2.1-mistral-7b"
# model id will be used to load our conversation template https://github.com/lm-sys/FastChat/blob/1db84d0906196673db361eac50d5aa65180a0ffe/fastchat/model/model_adapter.py#L1579
model_id="mistral-dolphin-sft"

# generate model answer
!python gen_model_answer.py --model-id {model_id} --model-path {model_path}
Note: Generating all responses can take a while, ~60 minutes or more.
Now, we generate the responses using the DPO model.
# Change this to where you saved the model during training, remember our current directory is FastChat/
model_path="/fsx/philipp/doplhin-dpo"

# model id will be used to load our conversation template https://github.com/lm-sys/FastChat/blob/1db84d0906196673db361eac50d5aa65180a0ffe/fastchat/model/model_adapter.py#L1579
model_id="mistral-dolphin-dpo"

# generate model answer
!python gen_model_answer.py --model-id {model_id} --model-path {model_path}
Note: Generating all responses can take a while, ~120 minutes or more.
3. Evaluate the responses using pair-wise comparison and GPT-4-Turbo as Judge
After we have the responses we can evaluate them using the gen_judgment.py script. This will pairwise compare all the responses using GPT-4-Turbo and rate which response is better.
Note: We need an OPENAI_API_KEY with access to GPT-4 Turbo, running MT-Bench will cost ~1-2$ per model evaluation.
open_ai_key="sk-xxxx" # replace with your openai key

# Pairwise comparison of the two models using OpenAI's GPT-4 Turbo
!OPENAI_API_KEY={open_ai_key} python gen_judgment.py --model-list "mistral-dolphin-dpo" "mistral-dolphin-sft" --judge-model "gpt-4-1106-preview" --mode "pairwise-all"
Note: This can take ~70 minutes.
4. Plot and compare the results
After we have the results we can plot them and compare the win-rate of the SFT and DPO model.
# Results are saved at the following location, make sure its correct
res = "./data/mt_bench/model_judgment/gpt-4-1106-preview_pair.jsonl"

!python show_result.py --input-file {res} --model-list "mistral-dolphin-dpo" "mistral-dolphin-sft" --judge-model "gpt-4-1106-preview" --mode pairwise-all

# display plot from image file
from PIL import Image
i = Image.open("win_rate_gpt-4-1106-preview.png")
i.show()
| model | win | loss | tie | win_rate | loss_rate | win_rate_adjusted |
|---|---|---|---|---|---|---|
| mistral-dolphin-dpo | 45 | 17 | 98 | 0.28125 | 0.10625 | 0.5875 |
| mistral-dolphin-sft | 17 | 45 | 98 | 0.10625 | 0.28125 | 0.4125 |

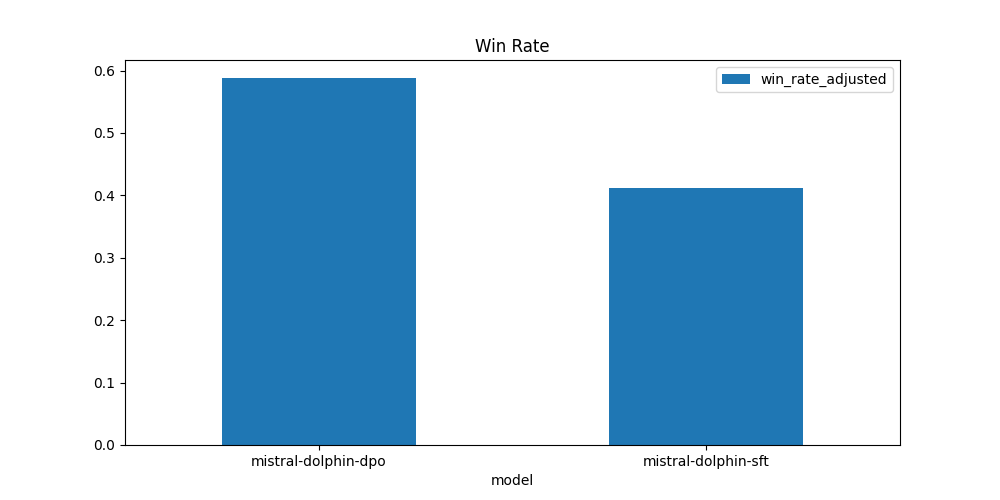
By using DPO we were able to achieve a win-rate of 0.5875 compared to 0.4125 with the SFT model. This means by applying DPO we tuned our model to generate responses, which are more aligned with what humans/AI would prefer. This is not optimal yet, but it's a good start.
Since the guide is only a starting point, you should consider additional evaluation methods, e.g. human evaluation or instruction-following capabilities. This means we might not have reached the full potential of the model. You should consider training for more epochs and on a larger dataset to improve the model further.
5. Clean up the FastChat Repository
Since we temporary cloned the FastChat repository we can now clean it up by deleting the directory.
Note: If you want to keep your evaluation results you should save the model_answer and judgment directory.
%cd ../../..

# delete the cloned repository
!rm -rf FastChat
Thanks for reading! If you have any questions, feel free to contact me on Twitter or LinkedIn.